The cheese ball has always been that unsung hero at parties, a little messy but always a crowd-pleaser. I love how a simple combination of cream cheese, sharp cheddar, and a handful of crunchy nuts can turn into something so nostalgic and satisfying. But lately, I’ve been playing with herbs and a spicy kick, just to shake things up without losing that cozy charm.
There’s something about rolling that mixture into a neat ball, then seeing everyone’s eyes light up when it’s served. It’s a recipe that feels familiar yet adaptable, perfect for casual gatherings or a quick appetizer to keep in the fridge. Honestly, it’s one of those things I keep coming back to—comfort food with a little twist to keep it interesting.
Focusing on the nostalgic comfort of a classic cheese ball, but with a twist—integrating unexpected herbs and a hint of spice to elevate this vintage appetizer into a more refined, yet still familiar, party staple.
A Nostalgic Twist on a Classic
- This cheese ball reminds me of lazy Sunday afternoons in my childhood kitchen, the smell of toasted nuts and sharp cheese filling the air.
- I love how a simple recipe can bring friends together—there’s a certain pride in rolling out a perfect, gooey center that everyone devours.
- Spreading a layer of herbs on the outside makes me feel like I’m elevating something nostalgic into a more sophisticated snack.
- Whenever I make this, I’m flooded with memories of holiday parties and the chaos of laughter and good cheer around the table.
- It’s one of those dishes where I’ve learned to embrace the imperfect—sometimes it cracks, sometimes it doesn’t, but it’s always delicious.
A Personal Cheese Ball Journey
- This cheese ball started as a way to use up the bits of cheese and nuts I had lying around. I remember one hectic holiday season, tossing together ingredients in a rush, and it turned out surprisingly good. That accidental success made me realize how forgiving and adaptable this dish is.
- I love how a cheese ball can be both a messy, casual affair and a showstopper on the table. It’s the kind of thing that feels like a warm hug but can be dressed up with herbs or spices for a more refined vibe. Every time I make it, I think about the chaos and comfort of family gatherings, and how a simple dish can bring everyone together.
- heading
- story_type
Cheese Ball Trivia & Origins
- The cheese ball gained popularity in mid-20th century America, often featured at potlucks and holiday parties.
- Originally called ‘cheese mold,’ early versions sometimes involved gelatin and ornate shapes, reflecting Victorian influences.
- It’s believed that the cheese ball became a staple because it’s easy to prepare ahead and serve in a communal setting.
- Herbs and spices were historically added to personalize each cheese ball, turning it into a signature dish for families or hosts.
- The concept of coating cheese in nuts or herbs dates back to European cheese accompaniments, adapted into this American appetizer.
Key Ingredients and Tips
- Cream cheese: I love how it’s silky and smooth, creating that luscious base. Feel free to soften it ahead to avoid lumps.
- Cheddar cheese: Sharp and tangy, it gives flavor punch. Use a good aged cheddar for more bite—skip the processed stuff if you can.
- Nuts: Toasted pecans add crunch and warm, buttery aroma. You might swap in walnuts or almonds, but toast them first for extra flavor.
- Herbs: Fresh parsley and chives brighten the mixture and add freshness. Dried herbs can work in a pinch, but fresh is best for vibrancy.
- Spices: A dash of smoked paprika or cayenne gives a subtle spicy kick. Adjust to your heat preference, but don’t skip the smoky flavor—adds depth.
- Optional extras: Diced ham or crispy bacon bits stir in a savory richness. If you want vegetarian, skip these, but keep the smoky spices.
- Coating: More chopped nuts or chopped herbs on the outside makes it pretty and adds flavor. Feel free to mix and match for visual appeal.
Spotlight on key ingredients
Cream cheese:
- I love how it’s silky and smooth, creating that luscious base. Feel free to soften it ahead to avoid lumps.
- Cheddar cheese: Sharp and tangy, it gives flavor punch. Use a good aged cheddar for more bite—skip the processed stuff if you can.
- Nuts: Toasted pecans add crunch and warm, buttery aroma. You might swap in walnuts or almonds, but toast them first for extra flavor.
Herbs & Spices:
- Herbs: Fresh parsley and chives brighten the mixture and add freshness. Dried herbs can work in a pinch, but fresh is best for vibrancy.
- Spices: A dash of smoked paprika or cayenne gives a subtle spicy kick. Adjust to your heat preference, but don’t skip the smoky flavor—adds depth.
Notes for ingredient swaps
- Dairy-Free: Swap cream cheese for a blend of soaked cashews and nutritional yeast. It won’t be as silky but still creamy with a nutty flavor.
- Cheddar: Use Monterey Jack or Pepper Jack for a milder or spicier profile. Vegan cheeses can also work but may alter the texture and flavor.
- Nuts: Almonds or cashews toasted first add crunch. For a softer bite, skip to chopped herbs only, but the crunch is part of the charm.
- Herbs: Dried parsley or chives can replace fresh, though the flavor will be less vibrant. Add a squeeze of lemon juice for brightness.
- Spices: Smoked paprika can be swapped with chipotle powder for a smoky punch or omit for a milder taste. Cayenne adds heat—use sparingly.
- Optional extras: Diced cooked bacon or ham can be replaced with sun-dried tomatoes or roasted red peppers for a vegetarian-friendly twist.
- Coating: Instead of nuts, try chopped olives or crispy fried shallots for added texture and flavor diversity.
Equipment & Tools
- Mixing bowl: Combine ingredients and mix thoroughly.
- Spatula: Fold ingredients and scrape bowl sides.
- Baking sheet: Chill and set the shaped cheese ball.
- Small plate or platter: For rolling and serving the coated cheese ball.
Step-by-step guide to cheese ball
- Equipment & Tools: Gather a mixing bowl (large, for blending), a spatula (for mixing), a baking sheet (for chilling), and a small plate or platter (for serving).
- Soften the cream cheese: Leave it out at room temperature for about 30 minutes until it’s soft and scoopable.
- Mix the base: In the bowl, combine softened cream cheese, grated sharp cheddar, chopped herbs, spices, and a pinch of salt. Stir until well blended, about 2-3 minutes, ensuring no lumps remain.
- Add crunch: Fold in toasted nuts for texture. If you prefer a smoother ball, reduce nuts or chop them finer.
- Shape the cheese ball: Using your hands or a spoon, form the mixture into a tight, smooth ball about 10cm (4 inches) in diameter. Wrap in plastic wrap if not serving immediately.
- Chill to set: Place the shaped cheese ball on the baking sheet, cover loosely, and refrigerate for at least 1 hour, or up to 24 hours for deeper flavor.
- Prepare the coating: While it chills, roughly chop additional herbs or nuts for coating. Spread on a plate for easy rolling.
- Coat the cheese ball: Remove from fridge, then roll generously in your chosen coating mixture, pressing lightly to adhere. For a more rustic look, skip perfect coating and just press nuts onto the surface.
- Rest before serving: Let sit at room temperature for about 10 minutes to soften slightly, enhancing flavor and texture.
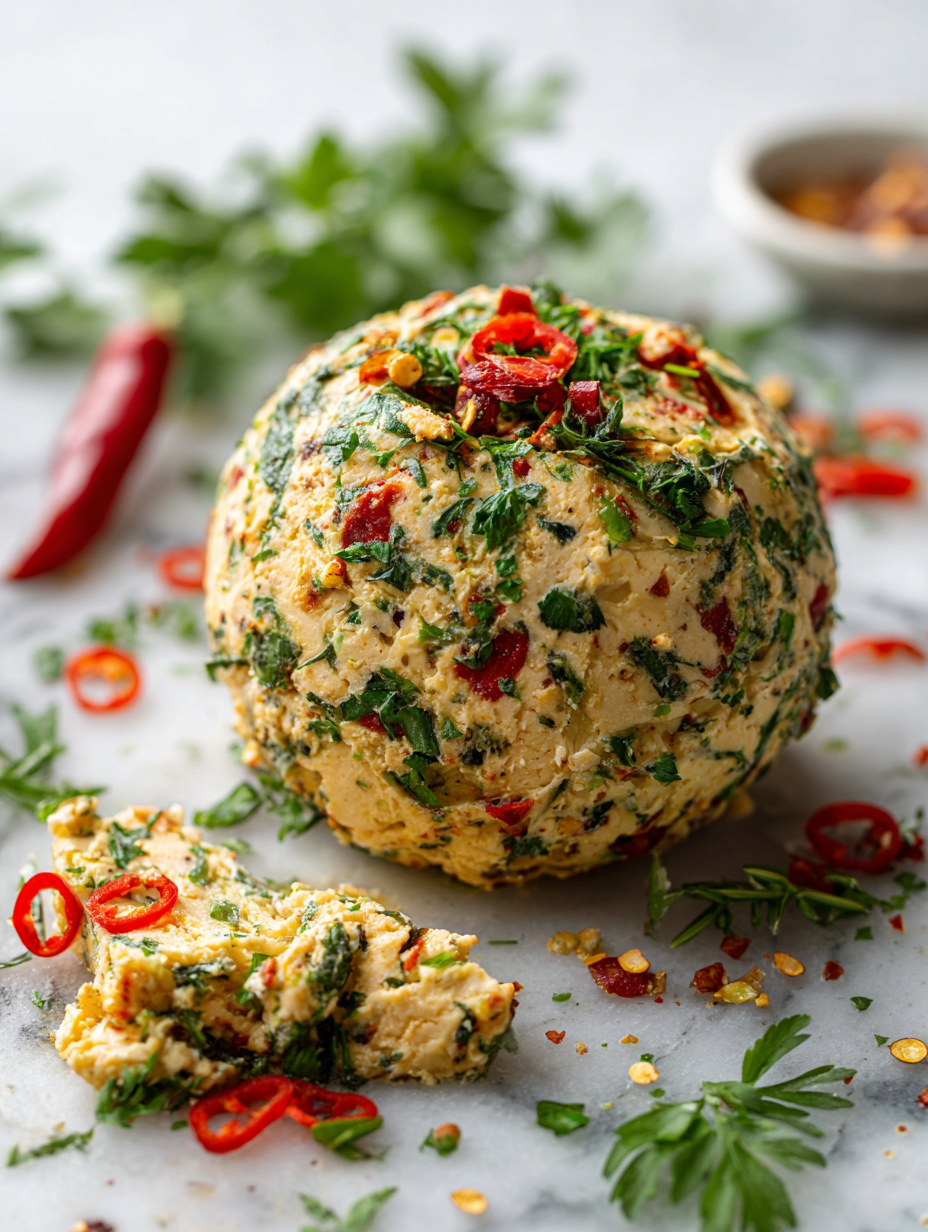
- Final checkpoints: The cheese should be firm but not hard, with a glossy, nutty exterior. The herbs should stick well, and the interior should be soft yet cohesive.
- Serve: Place on a platter, with crackers, sliced baguette, or fresh vegetables around. Enjoy the aroma of herbs and toasted nuts as you dig in.
Refrigerate the shaped cheese ball for at least 1 hour. Before serving, let it sit at room temperature for 10 minutes to soften slightly. Plate on a pretty dish, surrounded by crackers or sliced veggies, and enjoy the aroma of herbs and nuts.
How to Know It’s Done
- Cheese ball is firm but not hard, with a glossy, nutty exterior.
- Herbs and nuts are evenly coated and adhered.
- Interior is soft, smooth, and cohesive when sliced or bitten into.
Herbed Spicy Cheese Ball
Ingredients
Equipment
Method
- Gather your softened cream cheese, grated cheddar, chopped herbs, toasted nuts, and spices to have everything ready for mixing.
- In a large mixing bowl, combine the softened cream cheese and grated cheddar. Use a spatula to mix until the mixture is smooth and creamy, with no lumps remaining.
- Fold in the chopped parsley and chives, along with smoked paprika and cayenne pepper, to add flavor and a slight spicy kick. Mix well to evenly distribute the herbs and spices.
- Fold in the toasted pecans, ensuring they are evenly incorporated into the cheese mixture for crunch and flavor.
- Using your hands or a spoon, shape the mixture into a smooth, round ball about 4 inches in diameter. Wrap it tightly in plastic wrap if not serving immediately.
- Place the shaped cheese ball on a baking sheet or plate, and refrigerate for at least 1 hour to firm up and allow flavors to meld.
- While the cheese ball chills, chop additional toasted nuts and herbs for coating. Spread them out on a small plate for easy rolling.
- Once chilled, remove the cheese ball from the fridge. Roll it generously in the chopped nuts and herbs, pressing lightly to make sure the coating sticks evenly.
- Place the coated cheese ball on a serving platter and let it sit at room temperature for about 10 minutes to soften slightly and enhance flavor.
- Slice or serve the cheese ball with crackers, sliced baguette, or fresh vegetables. Enjoy the combination of creamy interior and crunchy, herb-coated exterior.
Notes
Tips for perfect cheese ball
- Bolded mini-head: Chill your cream cheese and herbs before mixing—cold ingredients blend more smoothly.
- Bolded mini-head: Toast nuts until golden and fragrant—this enhances flavor and adds a satisfying crunch.
- Bolded mini-head: Shape your cheese ball firmly, then chill for at least an hour—this helps it hold together better.
- Bolded mini-head: When coating, press nuts or herbs onto the surface—this ensures they stick and create a tempting crust.
- Bolded mini-head: Let the cheese ball sit at room temperature for 10 minutes before serving—this softens it slightly and boosts flavor.
- Bolded mini-head: Use a flexible spatula or your hands for shaping—this helps achieve a smooth, round form with less mess.
- Bolded mini-head: For extra visual appeal, roll in a mix of chopped herbs and nuts—variety makes it more inviting.
Common cheese ball mistakes and fixes
- FORGOT to keep cheese cold → Chill ingredients thoroughly for easier mixing.
- DUMPED too much spice → Add spices gradually and taste as you go.
- OVER-TORCHED nuts → Toast nuts on low heat until golden, then cool before chopping.
- MISSED step shaping → Use a spoon or your hands to shape firmly, avoiding cracks.
Quick Fixes for Cheese Ball
- When mixture feels too soft, splash in a little more nuts to firm it up.
- If herbs look dull, patch with fresh chopped parsley right before coating.
- Dumped too much spice? Rescue with a dollop of cream cheese to mellow heat.
- Over-torched nuts shimmer with a burnt aroma—toast on low heat, then cool quickly.
- heading:
Prep, store, and reheat tips
- Prepare the cheese mixture and shape into a ball up to 24 hours in advance for deeper flavor development and easier assembly later.
- Wrap the cheese ball tightly in plastic wrap and store in the refrigerator; it will keep well for 2-3 days, maintaining freshness and flavor.
- Coating the cheese ball with herbs and nuts can be done just before serving, which preserves their crunch and vibrant aroma.
- Reheat is not necessary; serve chilled or at room temperature after resting for 10 minutes to soften slightly and enhance flavor.
- Sensory note: The flavors intensify slightly overnight, with herbs blooming and nuts becoming even toastier, but avoid freezing as texture may suffer.
Top questions about cheese balls
1. What should the texture of a cheese ball be?
A cheese ball is typically soft and creamy inside, with a crunchy or herbal exterior depending on the coating. It’s a savory, tangy bite that melts slightly in your mouth.
2. Can I prepare the cheese ball in advance?
Yes, you can make a cheese ball ahead of time. Just shape and chill it in the fridge for up to 24 hours before coating and serving.
3. Should cheese ball be refrigerated or served at room temperature?
The best way to serve a cheese ball is at room temperature or slightly chilled. Let it sit out for about 10 minutes before slicing or serving to soften the interior.
4. What kinds of cheese work best for a cheese ball?
Use a sharp cheddar for a pronounced tang, or a milder cheese if you prefer a softer flavor. Toasting nuts brings out their aroma and crunch, so don’t skip that step.
5. Can I substitute herbs or nuts in the recipe?
If you don’t have fresh herbs, dried ones can work but will be less vibrant. Toasted nuts add flavor and crunch—try pecans, walnuts, or almonds.
6. What if my cheese mixture is too soft or nuts burn?
To fix a cheese mixture that’s too soft, chill it longer or add more chopped nuts. If nuts are burnt, start over with fresh, toasted nuts on low heat.
7. How long should I chill the cheese ball?
Chilling the shaped cheese ball for at least an hour helps it hold its shape and enhances flavor. For best results, wrap tightly in plastic wrap before refrigerating.
8. How do I get the coating to stick properly?
When coating, press herbs or nuts gently onto the surface to help them stick. For a more rustic look, just roll the ball in the coating mixture.
9. How do I fix burnt nuts or cracked cheese?
If your nuts look dull or burnt, toast them on low heat until golden and fragrant. If the cheese cracks, gently reshape and chill again.
10. What tools help shape a cheese ball properly?
Use a flexible spatula or your hands to shape the cheese ball smoothly. Chilling it firmly helps maintain shape, especially if the mixture is soft.
This cheese ball isn’t just a nostalgic appetizer; it’s a reminder that simple ingredients can create something memorable. Whether you’re enjoying it with friends or nibbling on leftovers, the aroma of toasted nuts and fresh herbs brings a sense of comfort and satisfaction.
In the end, it’s the imperfect, messy moments—cracked edges, slightly uneven coating—that make it real. A good cheese ball feels like a little celebration of home, a dish that invites everyone to gather around and share in its cozy, flavorful charm.

Hi, I’m Michael Anderson, the voice behind Overreacting To Salt. Yes, the name usually gets a laugh. And no, I am not actually afraid of salt. In fact, understanding salt and flavor balance is what inspired this entire blog.
 The voice behind Overreacting To Salt. Yes, the name usually gets a laugh. And no, I am not actually afraid of salt. In fact, understanding salt and flavor balance is what inspired this entire blog.
Overreacting To Salt is my space to talk honestly about cooking mistakes, kitchen wins, and the small details that make a big difference in flavor. I created it for home cooks who want to understand food better without feeling intimidated.
The voice behind Overreacting To Salt. Yes, the name usually gets a laugh. And no, I am not actually afraid of salt. In fact, understanding salt and flavor balance is what inspired this entire blog.
Overreacting To Salt is my space to talk honestly about cooking mistakes, kitchen wins, and the small details that make a big difference in flavor. I created it for home cooks who want to understand food better without feeling intimidated.