
Olives are often seen as just a salty snack, but inside each one lies a tiny universe of flavor waiting to be unlocked. Stuffing them transforms these little briny bites into something more elegant, fun, and surprisingly versatile. It’s a small step that really makes your snack game stand out at parties or quiet evenings alike.
What I love about stuffed olives is how they invite creativity without fuss. You can go classic with cheese and herbs or get wild with spicy peppers or nuts. Each bite offers a burst of layered flavor, and honestly, I find myself reaching for them more often than I’d admit, especially when I want a quick, satisfying nibble.
This recipe isn’t just about taste; it’s about creating tiny, beautiful bites that feel a little more special. It’s perfect for when you want to elevate a simple snack into a conversation starter, or just treat yourself to something a bit more indulgent without the fuss. Sometimes the smallest things make the biggest impact.
Focusing on the tiny, often overlooked world inside each olive, this recipe celebrates the art of transforming simple, briny bites into elegant, flavor-packed appetizers through creative stuffing ideas that highlight unexpected ingredients like herbs, nuts, and cheeses. It’s about elevating what seems like a straightforward snack into a memorable moment of culinary craftsmanship, perfect for moments when you want a small but impactful dish that sparks conversation and curiosity.
Tiny Bites, Big Flavor
- I love how these tiny bites can turn a casual gathering into a small celebration.
- There’s a nostalgic joy in stuffing olives that reminds me of my grandmother’s kitchen.
- Honestly, I feel a rush of pride when I see guests delight in the unexpected flavor combos.
- Sometimes I get a little chaotic, trying to find the perfect cheese or herb for each batch.
- These olives are my secret weapon for quick, impressive appetizers that don’t require much fuss.
The spark of inspiration
- This recipe actually started as a way to use up leftover tapenade and bits of cheese from my fridge. I was craving something salty, satisfying, but a little fancy. One afternoon, I found myself stuffing pitted olives with whatever I had, and it turned into this little ritual.
- What I love is how each batch feels like a tiny experiment—you never quite know if the smoked almonds or fresh herbs will steal the show. It’s a messy, imperfect process, but that’s part of the charm. Sometimes I think these small bites remind me that simple ingredients, when combined with a little care, can be surprisingly elegant.
- heading: ‘The spark of inspiration’
Historical and Cultural Roots
- Ancient Mediterranean cultures prized stuffed olives as a symbol of hospitality and abundance, often served during communal gatherings.
- The tradition of stuffing olives dates back to Roman times, where they were considered a luxurious appetizer among the elite.
- In some regions, olives were stuffed with local ingredients like almonds, garlic, or small bits of cheese, reflecting regional flavors and resources.
- Stuffed olives gained popularity in modern tapas culture, especially in Spain and Italy, where they are a staple on antipasto platters.
- This practice of transforming a humble briny snack into a culinary canvas continues to inspire home cooks worldwide, blending history with creativity.
Key Ingredients Breakdown
- Green olives: I love their firm, briny punch—makes stuffing feel like a little treasure hunt. If they seem too salty, rinse briefly before filling.
- Cream cheese: It’s my go-to for a smooth, mellow contrast. Swap with goat cheese for tang, but the texture will change slightly.
- Herbs (like dill or parsley): Bright, fresh notes that lift the richness. Dried herbs will work in a pinch, but fresh is best for vibrancy.
- Nuts (almonds or walnuts): Crunchy bits that add texture and depth. Toast them lightly first—your nose will catch that smoky aroma.
- Lemon zest: Adds a spark of citrus that cuts through the saltiness—don’t skip it, or the flavor may feel flat.
- Spicy peppers (like jalapeños): For a kick. Use fresh slices or pickled for more flavor, but be mindful of the heat level.
- Olive oil: Just a drizzle to keep everything moist and shiny. A good splash makes the filling feel luxurious, not greasy.
Spotlight on key ingredients
Green olives:
- I love their firm, briny punch—makes stuffing feel like a little treasure hunt. If they seem too salty, rinse briefly before filling.
- Cream cheese: It’s my go-to for a smooth, mellow contrast. Swap with goat cheese for tang, but the texture will change slightly.
- Herbs (like dill or parsley): Bright, fresh notes that lift the richness. Dried herbs will work in a pinch, but fresh is best for vibrancy.
Cream cheese:
- It’s my go-to for a smooth, mellow contrast. Swap with goat cheese for tang, but the texture will change slightly.
- Herbs (like dill or parsley): Bright, fresh notes that lift the richness. Dried herbs will work in a pinch, but fresh is best for vibrancy.
Notes for ingredient swaps
- Dairy-Free: Swap cream cheese for mashed avocado or coconut cream. Expect a richer, slightly sweeter flavor with less tang.
- Nut-Free: Use chopped sun-dried tomatoes or roasted chickpeas instead of nuts for crunch and umami, but lose the nutty aroma.
- Vegan: Replace cheese with seasoned tofu or cashew-based spreads. Keep in mind the texture will be creamier and less tangy.
- Herb Variations: Fresh basil or cilantro can replace dill or parsley for a different aromatic punch, but may alter the overall freshness.
- Citrus Zest: Lime zest can be used instead of lemon for a brighter, slightly more bitter note, depending on your preference.
- Spicy Peppers: Pickled jalapeños or banana peppers add different heat levels and tang, so adjust accordingly.
- Olive Oil: Use flavored oils like chili or garlic-infused for an extra layer of aroma; standard olive oil keeps it classic.
Equipment & Tools
- Small sharp knife: To pit the olives cleanly without tearing the fruit.
- Mixing bowl: To prepare and blend the stuffing ingredients.
- Small spoon: For filling the olives precisely and neatly.
- Plate: To hold the stuffed olives during resting and serving.
Step-by-step guide to stuffed olives
- Equipment & Tools: Gather small sharp knives, a mixing bowl, a small spoon, and a plate for stuffing.
- Start by pitting the olives if they aren’t already. Use a small knife to gently cut and remove the pit, avoiding tearing the fruit. This takes about 2 minutes per olive.
- Prepare the filling: In the bowl, mix softened cream cheese with chopped herbs, lemon zest, and a pinch of salt. Stir until smooth, tasting as you go.
- Use a small spoon to carefully stuff each olive with the cheese mixture. Don’t overfill; aim for a neat, slightly domed top. This step takes around 3 minutes per batch.
- Once stuffed, place the olives on a plate. Drizzle lightly with olive oil and sprinkle with extra herbs or nuts if desired. Let sit for 10 minutes to meld flavors.
- Optional: For an extra touch, briefly chill the stuffed olives in the fridge for 15-20 minutes before serving. This helps the filling firm up slightly.
Let the stuffed olives rest for 10 minutes at room temperature or chill in the fridge for 15-20 minutes. Serve directly from the plate, with a drizzle of olive oil or extra herbs for presentation.
How to Know It’s Done
- Filling is creamy and holds shape without oozing out.
- Olives are evenly stuffed with no tearing or bursting.
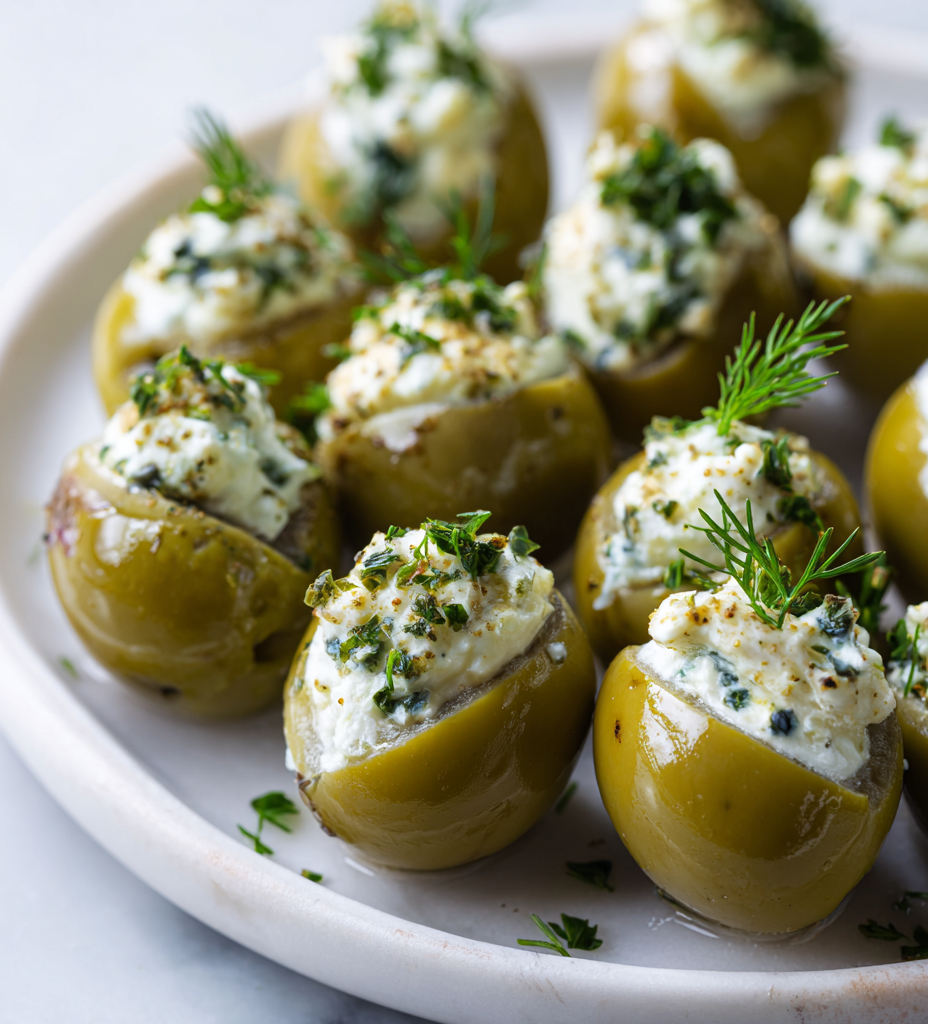
- Appearance is vibrant, with herbs and lemon zest visible, and a slight sheen from the olive oil.
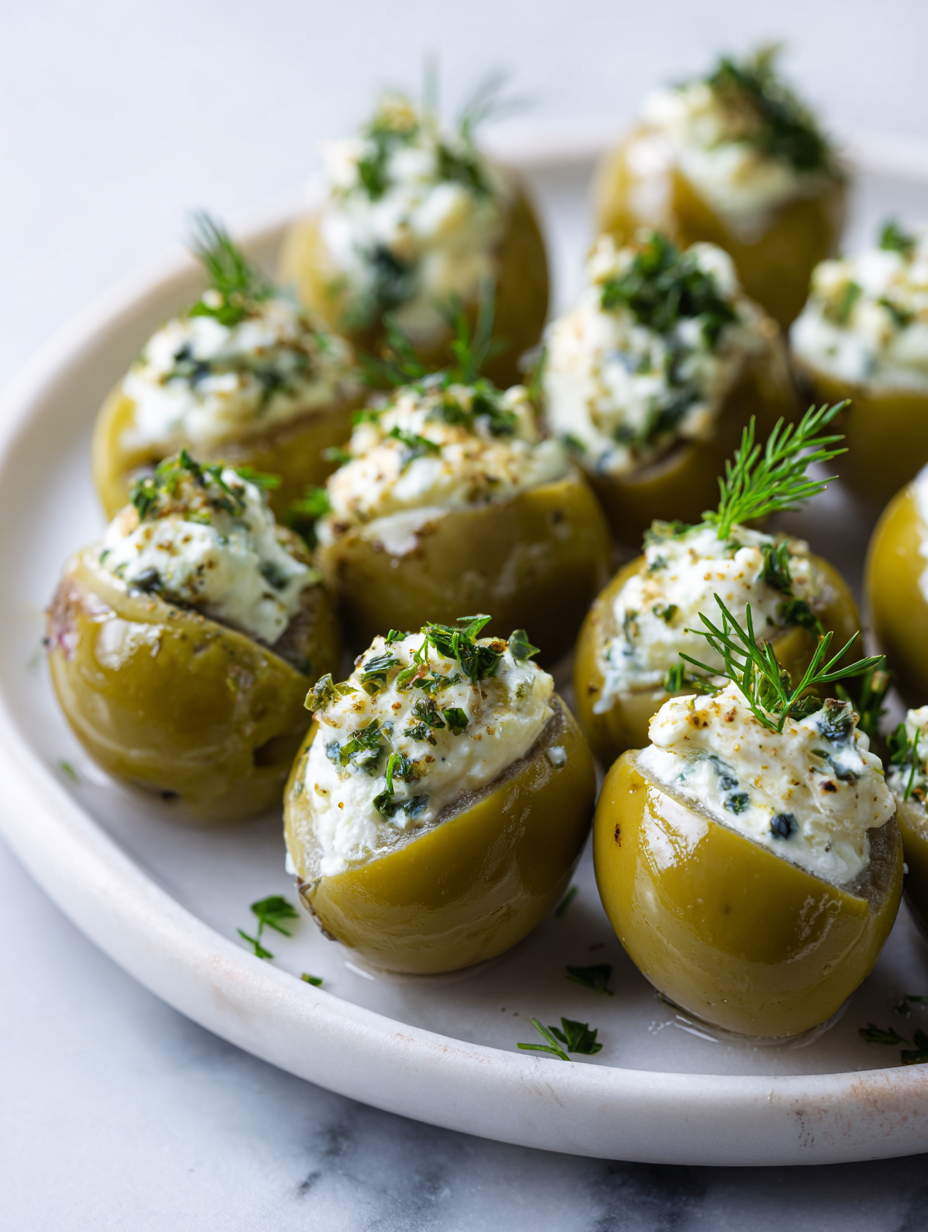
Stuffed Olives with Cream Cheese and Herbs
Ingredients
Equipment
Method
- Using a small sharp knife, carefully cut into each olive to remove the pit without tearing the fruit, setting the pit aside and keeping the olives intact.
- In a mixing bowl, combine softened cream cheese, chopped herbs, lemon zest, and a pinch of salt. Mix until smooth and fragrant, watching for a creamy, uniform consistency.
- Using a small spoon, gently fill each olive with the herb cream cheese mixture, pressing slightly to ensure the filling stays in place and is neat on top.
- Place the stuffed olives on a plate, then drizzle lightly with olive oil and sprinkle with toasted nuts for added crunch and flavor. Let them rest for about 10 minutes to allow the flavors to meld.
- If desired, chill the olives in the fridge for 15-20 minutes before serving to firm up the filling and enhance the flavors.
- Serve the stuffed olives at room temperature, enjoying their vibrant appearance and layered flavors as a perfect appetizer or snack.
Pro tips for stuffed olives
- Use ripe, firm olives for a sturdy stuffing that holds up without tearing.
- When mixing the filling, gently fold in herbs and nuts to keep the texture light and airy.
- Keep the filling slightly chilled before stuffing; it’s easier to handle and less sticky.
- For a shiny, appealing finish, brush the stuffed olives with a bit of olive oil before serving.
- If the filling starts to ooze out, chill the stuffed olives for 10 minutes to firm up the cheese.
- Toast nuts until fragrant but not browned to add a smoky crunch that complements the briny olives.
- When stuffing, press gently but firmly; overstuffing can cause the olive to split and leak.
Common mistakes and how to fix them
- FORGOT to dry olives thoroughly, resulting in soggy stuffing. Pat dry before filling.
- DUMPED too much oil in filling, making it greasy. Use sparingly for balance.
- OVER-TORCHED the nuts, turning them bitter. Toast lightly and watch closely.
- MISSED the resting time, which causes filling to slide out. Chill for better set.
Quick fixes and pantry swaps
- When olives are too salty, splash them with cold water to tone down the brine.
- If stuffing feels too loose, patch with a tiny dollop of cheese or cream cheese for stability.
- Splash a little extra olive oil if the filling cracks or looks dry during assembly.
- Rescue a crackling, burnt nut by quickly scooping out the burnt bits and replacing with fresh nuts.
- Pantry swap: Use jarred roasted peppers instead of nuts for a smoky crunch and vibrant color.
Prep, store, and reheat tips
- Prepare the cheese-herb filling and refrigerate in an airtight container for up to 24 hours. The flavors meld better after some rest, and it’s easier to stuff chilled olives.
- Store the stuffed olives in a single layer in a sealed container in the fridge for up to 2 days. The briny, savory notes deepen overnight, making them even more flavorful.
- Refrigerated olives will become firmer; let them sit at room temperature for 10 minutes before serving for optimal texture and aroma.
- For longer storage, freeze the stuffed olives in a freezer-safe container for up to a month. Thaw in the fridge and bring to room temp before serving; expect a softer bite but still delicious.
Top questions about stuffed olives
1. Do I need to pit the olives beforehand?
Use pitted olives to save time and prevent tearing the fruit during stuffing.
2. Should I dry the olives before stuffing?
Yes, pat the olives dry to avoid a soggy filling and ensure it stays in place.
3. Is chilling necessary after stuffing?
Chill the stuffed olives for about 15 minutes to help the filling set and stay put.
4. Can I use dried herbs instead of fresh?
Use fresh herbs for a vibrant, bright flavor; dried herbs work but won’t be as lively.
5. Can I substitute the cheese filling?
Yes, you can swap cream cheese for goat cheese or mascarpone for a tangy twist.
6. How should I prepare the nuts for stuffing?
Toast nuts lightly until fragrant but avoid burning to keep their crunch and smoky aroma.
7. Can I make stuffed olives in advance?
Stuffed olives can be prepared a day ahead and kept refrigerated, but serve at room temp for best flavor.
8. What if the filling is too runny?
If the filling is too loose, chill it briefly or add a bit more cheese to thicken.
9. How do I know when olives are ready to serve?
Olives should be firm and bright with a shiny appearance; avoid dull or split fruits.
10. What if my olives are too salty?
When olives taste overly salty, rinse them briefly in cold water before stuffing to mellow the brine.
These stuffed olives are a reminder that small changes can make a big impact. They turn a simple snack into a conversation piece, perfect for sharing or just enjoying on your own. Sometimes, it’s the tiniest bites that leave the biggest impression, especially when they’re packed with flavor and a little bit of your own touch. Enjoy the process and savor every bite.
In the end, this recipe is about celebrating the overlooked, transforming what’s basic into something memorable. Keep experimenting with fillings and flavors—each batch is a tiny adventure. Sometimes the simplest ingredients, treated with care, make the most satisfying, unexpected bites.

I grew up in a small town in Oregon, United States. After years of experimenting (and failing) with recipes, I realized food wasn’t just about cooking—it was about connection.