When I think about making sticky pork ribs, I’m reminded that the real magic lies in the caramelization. It’s not just about slathering on sauce; it’s about patiently coaxing out that deep, amber glaze that clings to every ridge of the meat. Achieving that perfect sticky exterior takes a little attention, a little heat, and a lot of tasting along the way.
This recipe is my go-to when I want something soulful but still crave that crispy, gooey finish. I’ve learned over years that rushing the process just leaves you with dull, slimy ribs. The key is balancing heat and patience—allowing the sugars to burn just enough to create that irresistible, slightly smoky, caramel-coated crust that makes every bite a little more addictive.
Focusing on the caramelization process—that perfect, sticky glaze is the result of a delicate balance between patience and heat, not just sauce.
The caramelization secret
- Cooking these ribs always takes me back to summer barbecues with friends, the smoky air mingling with sweet, sticky notes.
- There’s a quiet pride I feel when I see that perfect glaze crackle as I carve into the ribs—like a little victory on a plate.
- I used to rush the caramelization, ending up with burnt edges and disappointment; now I savor each stage, patience rewarded.
- The smell of caramelized sugar and pork fat bubbling together is oddly comforting, like a secret kept in my kitchen.
- Every time I make these, I remember that good food is about the small, slow moments—waiting for that perfect sticky finish.
The story behind this recipe
- Making these sticky pork ribs is a bit like chasing a caramel dream. I remember the first time I tried to get that glaze just right—messy, smoky, a little chaotic, but oh so worth it. It’s not about rushing; it’s about patience and watching that sugar bubble and turn deep amber. Once you get that burnished, sticky crust, every bite feels like a small victory.
- This recipe came together after a summer of experimenting—trying to balance sweet, smoky, and savory without losing that tender, fall-off-the-bone meat. I love how the process makes the kitchen smell like a candy shop mixed with barbecue. It’s a messy, glorious chaos that ends with something I keep going back to—crisp, sticky, and totally addictive.
- heading: ‘The caramelization secret
Trivia and Historical Notes
- Pork ribs have been a staple in many ancient cuisines, with variations found from China to the Caribbean.
- The term ‘sticky’ in relation to ribs gained popularity in American barbecue culture during the mid-20th century.
- Caramelizing sugar on meat dates back to traditional Chinese cooking methods, where a balance of sweet and savory was prized.
- In some regions, ribs were historically cooked over open flames, allowing the sugars to char and develop that signature sticky glaze.
- Modern recipes often incorporate techniques from both slow roasting and high-heat finishing to achieve the perfect glaze.
Ingredient breakdown
- Pork ribs: I love using bone-in ribs for maximum flavor; their marbled fat keeps the meat juicy and tender, but you can swap for boneless if you prefer easier eating.
- Brown sugar: The backbone of that sticky glaze, it caramelizes beautifully—try honey or maple syrup as a swap for a different sweet note, but watch for quicker burning.
- Soy sauce: Adds depth and umami; if you want a gluten-free version, coconut aminos work well without sacrificing that salty punch.
- Garlic: Fresh cloves give a punch of aroma, but roasted garlic can add a mellow, sweet layer—skip if you’re in a pinch and use garlic powder instead.
- Smoked paprika: It’s my secret to that smoky undertone, but chipotle powder can substitute if you want extra heat and smoky complexity.
- Apple cider vinegar: Brightens the glaze with a tangy zing, but lemon juice can give that fresh citrus lift—skip if you prefer a milder flavor.
- Sesame oil: Just a touch brings a nutty aroma, but if you’re out, toasted sesame seeds sprinkled at the end give that same rich aroma.
Spotlight on key ingredients
Pork Ribs:
- I prefer the marbled, bone-in variety for flavor and juiciness; boneless can work but may dry out faster.
- The ribs’ connective tissue melts during slow cooking, making the meat tender and easy to pull apart, with a rich, porky aroma.
Brown Sugar:
- Its sticky, caramelized sweetness forms the base of that glossy glaze—try honey if you want a floral note, but it burns quicker.
- It bubbles and darkens as it cooks, turning that irresistible deep amber, giving the ribs their signature sticky finish.
Notes for ingredient swaps
- Pork Ribs: Baby back or spare ribs work, but spare ribs have more fat and connective tissue for extra flavor and juiciness. For a leaner option, try chicken thighs—though it won’t be as traditional.
- Brown Sugar: Use honey or maple syrup as a substitute for a different aroma and slightly different sweetness, but keep an eye on the burn risk as they caramelize faster.
- Soy Sauce: Coconut aminos can replace soy sauce if you need a gluten-free or soy-free option; they add a milder umami flavor without losing depth.
- Garlic: Fresh garlic cloves give the best punch, but garlic powder can be used in a pinch—just reduce the quantity to avoid overpowering the glaze.
- Smoked Paprika: Chipotle powder adds extra smoky heat if you like a bit of spice and smoky complexity, but start with less and adjust to taste.
- Apple Cider Vinegar: Lemon juice can brighten the glaze with citrus brightness if you prefer a sharper tang or don’t have vinegar on hand.
- Sesame Oil: Toasted sesame seeds sprinkled at the end can mimic that nutty aroma if sesame oil isn’t available—just don’t cook it at high heat.
Equipment & Tools
- Large baking dish: To hold the ribs during slow baking.
- Aluminum foil: To seal in moisture and trap heat.
- Basting brush: To apply the glaze evenly.
- Sharp knife: To remove silver skin and slice ribs.
- Saucepan: To simmer and thicken the glaze.
- Oven broiler: To caramelize the glaze for that sticky finish.
Step-by-step guide to sticky ribs
- Gather your equipment: a large baking dish, aluminum foil, basting brush, and a sharp knife. Preheat your oven to 150°C (300°F).
- Pat the ribs dry with paper towels. Remove the thin silver skin from the back if it’s still on—this helps the glaze stick better.
- Mix your dry rub (salt, pepper, smoked paprika, garlic powder). Rub it generously all over the ribs. Let sit for 15 minutes to absorb flavors.
- Place the ribs meat-side up in the baking dish. Cover tightly with foil, sealing the edges well.
- Bake for 2.5 to 3 hours. The meat should be tender and jiggle slightly when moved. Check for a deep aroma of cooked pork and spices.
- While the ribs bake, prepare your sticky glaze: combine brown sugar, soy sauce, garlic, smoked paprika, apple cider vinegar, and a splash of sesame oil in a saucepan. Bring to a simmer over low heat for 5-7 minutes until thickened. Stir occasionally.
- Remove the ribs from the oven. Carefully lift the foil and transfer the ribs to a large sheet pan lined with foil or parchment. Brush generously with the glaze, coating every ridge.
- Broil on high (around 220°C/430°F) for 4-6 minutes. Keep a close eye—look for bubbles and caramelization. The glaze should turn deep amber and slightly crispy at the edges.
- Remove from the oven. Let rest for 5 minutes so the juices settle. During this time, the glaze will set a little—don’t skip this step.
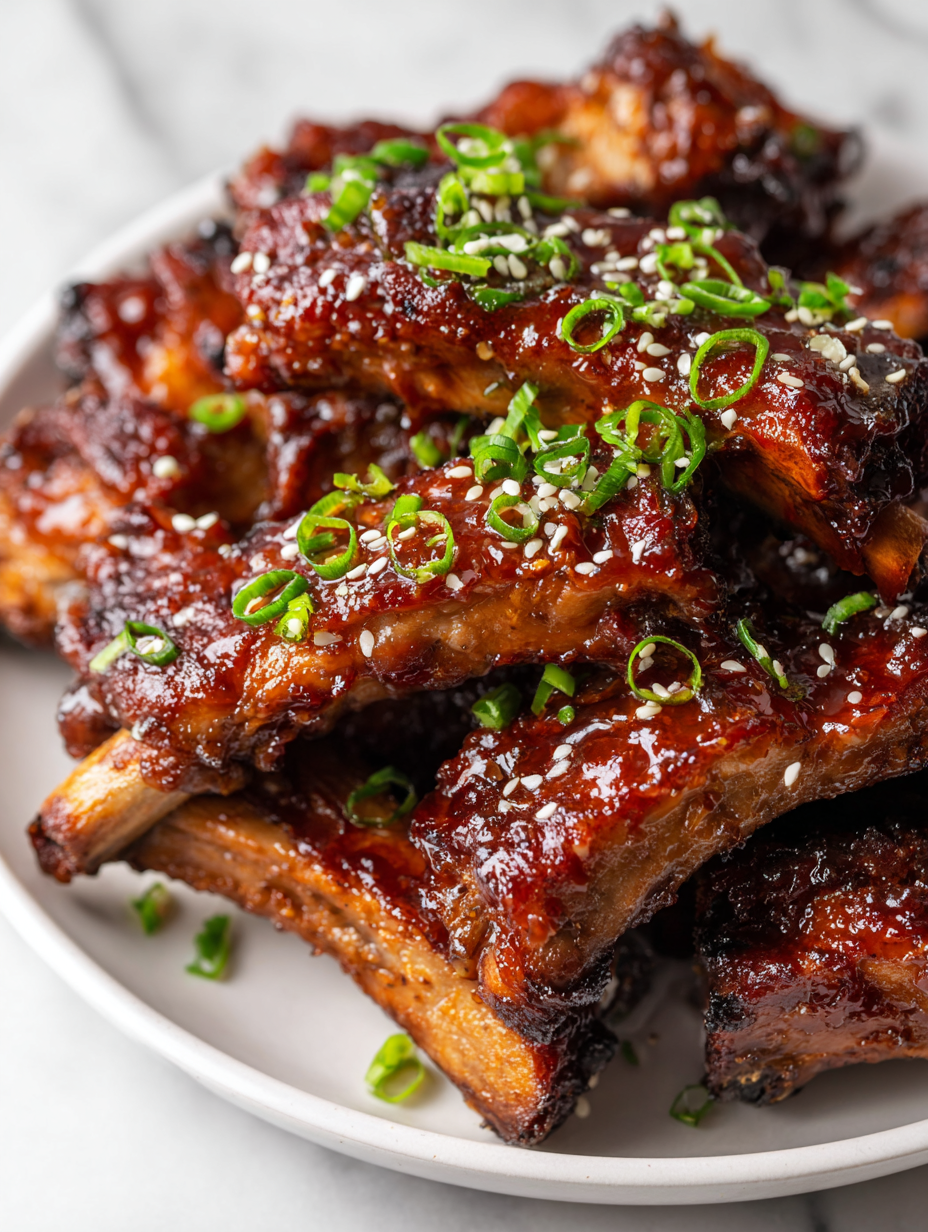
- Slice between the bones, serve with extra glaze on the side. The ribs should be sticky, glossy, and caramelized, with a smoky aroma and tender meat pulling away from the bones.
Let the ribs rest for 5 minutes after broiling. Slice between the bones, serve immediately with extra glaze. The resting allows the juices to redistribute and the glaze to set, ensuring each bite is juicy and sticky.
How to Know It’s Done
- The meat is tender and jiggles slightly when moved.
- The glaze is deep amber, sticky, and slightly crispy at the edges.
- The ribs release easily from the bones with a gentle pull.
Sticky Caramelized Pork Ribs
Ingredients
Equipment
Method
- Preheat your oven to 150°C (300°F). Pat the ribs dry with paper towels, then remove the silver skin from the back with a sharp knife for better glaze adhesion.
- Mix together salt, pepper, smoked paprika, and garlic powder to create a dry rub. Generously massage this mixture all over the ribs, ensuring every ridge is coated. Let them sit for 15 minutes to absorb the flavors.
- Place the ribs meat-side up in a large baking dish. Cover tightly with aluminum foil to trap moisture and slow cook for about 2.5 to 3 hours, until the meat is tender and jiggles slightly when moved.
- While the ribs are baking, prepare the glaze: combine brown sugar, soy sauce, minced garlic, smoked paprika, apple cider vinegar, and sesame oil in a saucepan. Bring to a gentle simmer over low heat, stirring often, until the mixture thickens slightly and turns a deep amber color, about 5-7 minutes.
- Carefully remove the baked ribs from the oven and lift off the foil. Transfer them to a foil-lined sheet pan. Using a basting brush, generously coat the ribs with the caramelized glaze, covering all the ridges and edges.
- Place the glazed ribs under the broiler set to high (around 220°C/430°F). Broil for 4-6 minutes, watching closely as the glaze bubbles and deepens to a glossy, crispy finish. The edges should develop a slight char and sticky sheen.
- Remove the ribs from the oven and let them rest for 5 minutes. This allows the glaze to set and the juices to redistribute, resulting in juicy, sticky meat with a crispy exterior.
- Slice the ribs between the bones with a sharp knife. Serve immediately, ensuring each piece is coated with the beautiful, sticky glaze for maximum flavor and visual appeal.
Pro tips for sticky ribs
- Bolded mini-head: Caramelize slowly → Patience is key; let the sugar bubble and deepen in color without rushing the process.
- Bolded mini-head: Use high heat carefully → Broil on high but stay close; the glaze can burn quickly if unattended.
- Bolded mini-head: Apply multiple coats → Brush on several layers of glaze, allowing each to set before the next for maximum stickiness.
- Bolded mini-head: Watch for color change → The glaze should turn a deep amber with a glossy sheen—remove before it darkens too much.
- Bolded mini-head: Rest before slicing → Let the ribs sit for 5 minutes after broiling; this helps the glaze set and keeps the meat juicy.
Common mistakes and how to fix them
- FORGOT to caramelize: Burnt glaze ruins flavor—keep a close eye and reduce heat if needed.
- DUMPED the sauce: Not enough glaze leads to dry ribs—baste generously and repeat broiling.
- OVER-TORCHED the edges: Charred bits can taste bitter—cover edges with foil during broil.
- SKIPPED resting time: Juices escape—let ribs rest 5 minutes before slicing for maximum juiciness.
Quick kitchen fixes for sticky ribs
- When sauce is too thin, splash in a bit of cornstarch slurry and simmer for 2 minutes.
- If glaze isn’t sticky enough, increase heat slightly and brush on a second layer during broil.
- Dumped the ribs during baking? Patch with foil and continue slow roasting to prevent dryness.
- Over-torched edges? Shield with foil and reduce broil time to avoid bitter char.
- heading: “Quick fixes and pantry swaps”
Prep, store, and reheat tips
- You can prepare the dry rub and marinate the ribs a day ahead for deeper flavor; keep covered in the fridge, and the aroma develops overnight.
- The cooked ribs can be stored in an airtight container in the fridge for up to 3 days. Reheat gently in the oven at 150°C (300°F) covered with foil, until warmed through and sticky again.
- Leftover glaze can be made ahead and kept refrigerated for up to 2 weeks; reheat gently and brush onto ribs during final broil for extra gloss.
- For freezer storage, double-wrap cooked ribs in plastic wrap and foil; they’ll keep for up to 2 months. Thaw in the fridge overnight before reheating.
- Reheating will intensify the glaze’s sweetness and smoky aroma. Expect the texture to firm up slightly, so brush with a little fresh glaze or marinade before broiling briefly to regain stickiness.
Top questions about sticky pork ribs
1. What ribs are best for sticky pork ribs?
Look for ribs with good marbling and bone-in for maximum flavor. The fat keeps the meat juicy and tender, which is key for that sticky, fall-off-the-bone texture.
2. Can I substitute brown sugar in the glaze?
Brown sugar is the backbone of the glaze, giving that deep caramel flavor. Honey or maple syrup can swap in for a different aroma, but watch for quicker burning during caramelization.
3. Why is slow cooking important for these ribs?
Cooking the ribs slowly at low temperature helps break down connective tissue, making the meat tender and juicy. Rushing this step can leave the ribs tough and dry.
4. How do I get the glaze to caramelize properly?
Broiling at high heat is what creates that glossy, crispy glaze. Keep a close eye—burnt glaze will taste bitter and ruin the texture.
5. My glaze isn’t sticky enough, what do I do?
If your glaze isn’t sticky enough, brush on additional layers and broil briefly after each coat. This builds that irresistible, gooey finish.
6. Why should I let the ribs rest before slicing?
Rest the ribs for about 5 minutes after broiling. This allows the juices to redistribute and the glaze to set, making each bite juicy and sticky.
7. How do I prevent burning during broiling?
Using a broiler on high gives the glaze a quick, intense caramelization. Keep the ribs close and watch carefully to avoid burning.
8. How should I store and reheat leftovers?
Leftover ribs can be stored in the fridge for up to 3 days. Reheat covered in the oven at 150°C (300°F) until warmed through and sticky again.
9. What if my glaze is too runny?
For a quick fix if the glaze is too thin, stir in a cornstarch slurry and simmer for 2 minutes until it thickens.
10. How do I fix burnt edges?
If edges are over-charred, shield them with foil during broiling and reduce the broil time. For a quick fix, brush with more glaze and broil briefly.
Making these sticky pork ribs is a bit like chasing a caramel dream. I remember the first time I tried to get that glaze just right—messy, smoky, a little chaotic, but oh so worth it. It’s not about rushing; it’s about patience and watching that sugar bubble and turn deep amber. Once you get that burnished, sticky crust, every bite feels like a small victory.
This recipe came together after a summer of experimenting—trying to balance sweet, smoky, and savory without losing that tender, fall-off-the-bone meat. I love how the process makes the kitchen smell like a candy shop mixed with barbecue. It’s a messy, glorious chaos that ends with something I keep going back to—crisp, sticky, and totally addictive.

Hi, I’m Michael Anderson, the voice behind Overreacting To Salt. Yes, the name usually gets a laugh. And no, I am not actually afraid of salt. In fact, understanding salt and flavor balance is what inspired this entire blog.
 The voice behind Overreacting To Salt. Yes, the name usually gets a laugh. And no, I am not actually afraid of salt. In fact, understanding salt and flavor balance is what inspired this entire blog.
Overreacting To Salt is my space to talk honestly about cooking mistakes, kitchen wins, and the small details that make a big difference in flavor. I created it for home cooks who want to understand food better without feeling intimidated.
The voice behind Overreacting To Salt. Yes, the name usually gets a laugh. And no, I am not actually afraid of salt. In fact, understanding salt and flavor balance is what inspired this entire blog.
Overreacting To Salt is my space to talk honestly about cooking mistakes, kitchen wins, and the small details that make a big difference in flavor. I created it for home cooks who want to understand food better without feeling intimidated.