Getting the perfect sear on scallops isn’t just about heat — it’s about moisture control. I used to rush into cooking them, only to end up with rubbery, underwhelming bites that made me want to toss the pan. Once I started paying attention to how dry the scallops are before they hit the hot surface, everything changed.
This recipe is my quiet rebellion against the common mistake of overloading the pan or rushing the process. I like to think of it as a small ritual — drying, seasoning, patience — that transforms these delicate morsels into something truly special. It’s surprisingly simple, but mastering that moisture is what makes all the difference.
Focusing on the overlooked importance of the scallops’ moisture content and how controlling it can make or break the perfect sear.
The moisture dance of perfect scallops
- The first time I nailed that golden, crispy crust — I felt like I’d unlocked a secret kitchen trick.
- Watching the scallops turn from translucent to opaque with that perfect sear still makes me smile, even after dozens of tries.
- There’s a quiet pride in mastering moisture control, especially when everything else in the kitchen feels chaotic.
- I remember rushing through a batch once, only to get rubbery scallops — now I savor every step, no shortcuts.
- Serving these with a simple squeeze of lemon feels like sharing a small victory — bright, fresh, and just right.
The story behind this recipe
- I once had a moment in a tiny seaside town where I watched a fisherman dry scallops on a cloth before cooking. That simple act stuck with me — how moisture can make or break a sear, no matter how hot your pan. It’s a small detail, but it’s everything.
- I started experimenting, drying scallops thoroughly before hitting the pan, and suddenly, the difference was clear. That perfect, golden crust became the norm, not the exception. It’s funny how such a tiny step can transform the whole dish — now it’s my go-to for a quick, satisfying meal.
- heading: “The quiet science behind searing”
Historical & Cultural Tidbits
- Pan-searing scallops became popular in French cuisine in the 19th century, emphasizing simple, high-heat techniques to preserve their delicate texture.
- Scallops have been a prized shellfish since ancient times, often considered a luxury item in Roman and Egyptian dining traditions.
- The technique of dry searing scallops helps retain their natural sweetness and gives that coveted crispy crust, a method passed down through coastal culinary cultures.
Ingredient breakdown
- Fresh scallops: I always look for dry, plump scallops that feel firm—avoid anything slimy or overly wet. You want that natural sweetness to shine without excess moisture.
- Salt: I prefer flaky sea salt for seasoning—just a light sprinkle helps enhance the natural flavor without overpowering the delicate seafood notes.
- Oil: I use a high-smoke-point oil like canola or grapeseed, which crisps the scallops nicely without imparting any flavor—look for that shimmering shimmer when it’s hot.
- Lemon or acid: A squeeze of fresh lemon brightens everything—don’t skip it, even a tiny drizzle can lift the entire dish and cut through the richness.
- Butter (optional): A small pat at the end adds a glossy finish and depth—use sparingly if watching calorie intake, but it’s worth the extra richness.
- Pepper: Freshly cracked black pepper adds a subtle heat and complexity—don’t forget to grind it just before serving for the best bite.
- Herbs (optional): A few chopped chives or parsley can add freshness—preferably added at the last moment to keep their brightness intact.
Spotlight on key ingredients
Scallops:
- Fresh scallops: I look for dry, firm scallops—avoid anything slimy or overly wet. Their natural sweetness depends on proper handling.
- Scallops behave differently depending on freshness; fresh ones sear beautifully, developing that perfect caramelized crust.
Oil:
- High-smoke-point oil: I prefer grapeseed or canola—shimmering in the pan signals readiness, helps crisp without burning.
- Oil choice influences the sear; too smoky or oily, and the scallops can become greasy or bitter.
Notes for ingredient swaps
- Seafood Alternatives: Cod or halibut can be used if scallops are unavailable, but they won’t sear as quickly or develop the same crust.
- Oil Options: Grape seed or canola oil are best for high heat, but if you prefer a nutty flavor, light sesame oil works — just use sparingly.
- Salt Variations: Kosher salt or flaky sea salt both work well; table salt is fine but use less to avoid over-salting.
- Acid Boost: Instead of lemon, a splash of lime or a dash of vinegar can brighten the dish, adding a slightly different tang.
- Butter Substitute: Use a neutral oil or a splash of chicken or vegetable broth for a lighter finish—skip the richness but keep the moisture.
- Herb Options: Fresh thyme or tarragon can replace parsley or chives, adding a different aromatic note—add at the end for maximum freshness.
- Pepper Variants: White pepper or a pinch of cayenne can replace black pepper, giving a different heat and flavor profile.
Equipment & Tools
- Heavy skillet (cast iron preferred): Ensures even heat and a crisp sear
- Tongs: For flipping and handling scallops gently
- Paper towels: To thoroughly dry scallops and drain excess oil
- Spatula: For gentle turning and removing scallops
- Lemon: To brighten and finish the dish
Step-by-step guide to pan searing
- Equipment & Tools: Use a heavy-bottomed skillet—preferably cast iron—for even heat and a good sear. Have tongs, a small plate, paper towels, and a spatula ready for quick handling and flipping.
- Pat the scallops dry with paper towels until no moisture remains—about 2-3 minutes per batch. Moisture is your enemy here; a dry surface is key for that golden crust.
- Lightly season both sides with flaky sea salt and freshly cracked black pepper—just enough to enhance flavor, not overpower.
- Heat the skillet over medium-high heat until it’s shimmering—about 2 minutes. Add a high-smoke-point oil, like grapeseed—just enough to coat the bottom, about 1-2 tablespoons.
- Carefully place the scallops in the hot pan, spaced apart—don’t overcrowd. You should hear an immediate crackle. Sear without touching for 2-3 minutes until they develop a deep, golden-brown crust.
- Flip the scallops gently with tongs or a spatula. Cook for another 1-2 minutes until the other side is similarly golden and the scallops are opaque at the center—slightly springy but not rubbery.
- Step 6a: If the scallops start to brown too quickly, reduce heat slightly. If they stick, don’t force—they should release easily when properly seared.
- Step 6b: For a touch of richness, add a small pat of butter during the last 30 seconds, swirling the pan to coat the scallops evenly.
- Remove scallops immediately and transfer to a plate lined with paper towels to drain excess oil—rest for 1 minute to finish cooking and allow juices to settle.
- Plate the scallops carefully, squeeze fresh lemon over, and garnish with herbs if desired. Serve immediately, enjoying that crispy exterior and tender interior.
Transfer scallops to a plate, squeeze fresh lemon, and garnish with herbs if using. Serve immediately while crispy and hot.
How to Know It’s Done
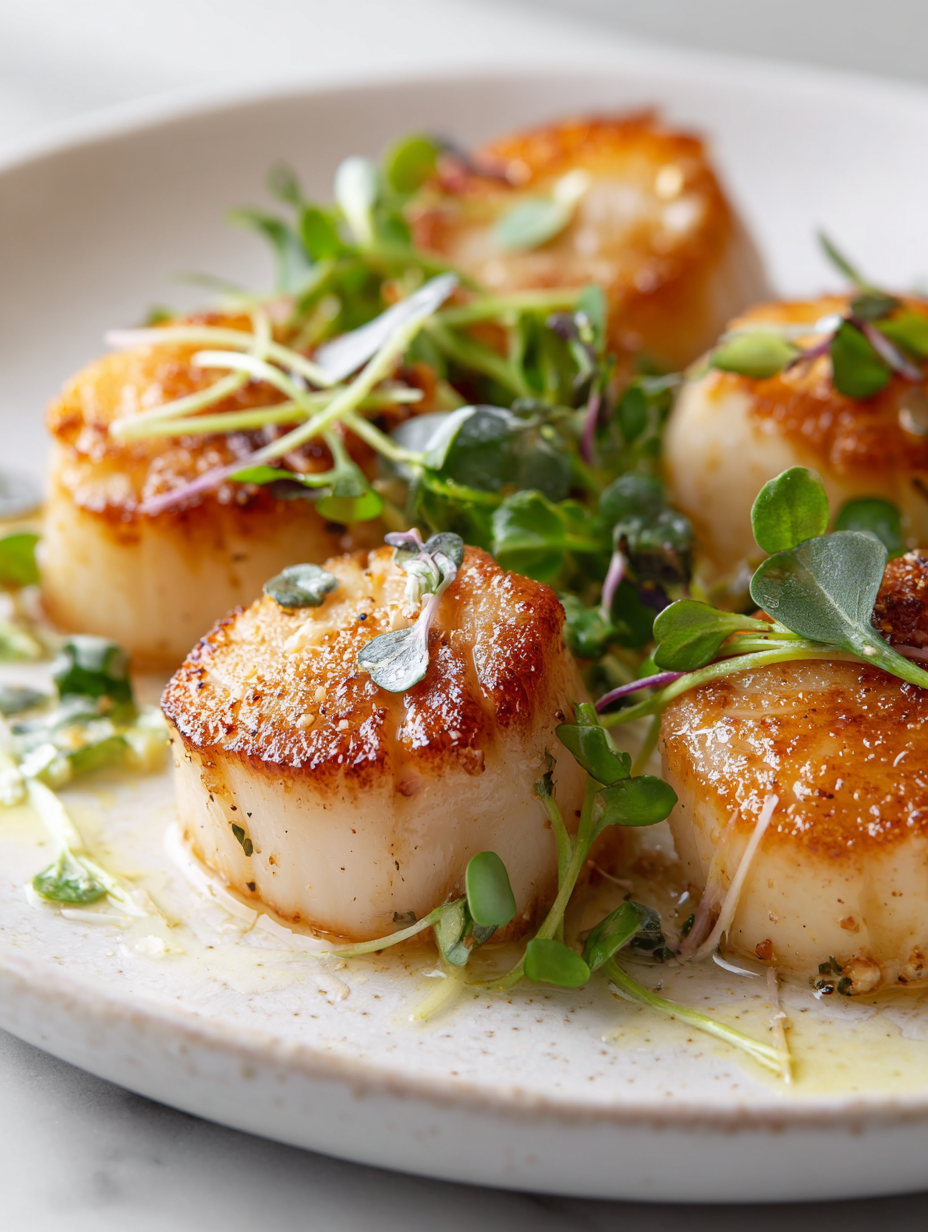
- Golden-brown crust with a slight shimmer when oil is hot.
- Scallops are opaque at the center but still moist and tender.
- No sticking or tearing when flipping; they lift easily from the pan.
Perfect Pan-Seared Scallops
Ingredients
Equipment
Method
- Pat the scallops completely dry with paper towels until no moisture remains. This step is crucial for achieving a perfect sear.
- Sprinkle each scallop generously with flaky sea salt and freshly cracked black pepper on both sides, enhancing their natural flavor.
- Heat your heavy skillet over medium-high heat until shimmering hot, about 2 minutes. Add the oil, swirling to coat the bottom evenly.
- Carefully place the scallops into the hot pan, spacing them apart. You should hear an immediate sizzle; let them sear undisturbed for about 2-3 minutes until a golden-brown crust forms.
- Flip each scallop gently using tongs or a spatula. Cook for another 1-2 minutes until the other side is equally golden and the scallops become opaque at the center.
- Optional: During the last 30 seconds, add a small pat of butter to the pan and swirl it around to coat the scallops, adding richness and shine.
- Transfer the scallops to a plate lined with paper towels to drain excess oil and rest for about 1 minute. This helps retain their juices and finish cooking.
- Squeeze fresh lemon over the scallops and garnish with chopped herbs if desired. Serve immediately while the exterior is crispy and the interior tender.
Notes
Pro Tips for Perfect Scallops
- Dry scallops thoroughly: Use paper towels to remove all moisture—moisture prevents a proper sear and leads to soggy scallops.
- Preheat the pan: Get your skillet shimmering hot—about 2 minutes on medium-high—so the scallops sizzle immediately upon contact.
- Avoid overcrowding: Space the scallops in the pan—crowding causes steaming, not searing, and dulls the crust.
- Use high-smoke-point oil: Grape seed or canola oil works best—shimmering oil signals the right temperature for a crisp exterior.
- Resist flipping too early: Wait until the scallops release easily and develop a golden crust—about 2-3 minutes—then flip gently.
- Finish with butter: A small pat at the end adds richness and gloss—swirl it in during the last 30 seconds for flavor depth.
- Serve immediately: Transfer scallops to a warm plate and squeeze lemon—serve while crispy and tender, for maximum impact.
Common mistakes and how to fix them
- FORGOT to dry scallops thoroughly before searing → They won’t develop a crust, leading to soggy results.
- DUMPED oil directly into hot pan → Use a small amount and swirl to prevent splatters and uneven searing.
- OVER-TORCHED the scallops or pan → Reduce heat immediately and remove scallops if they brown too fast.
- MISSED the resting step after searing → Rest for a minute to keep juices in and avoid rubbery bites.
Quick fixes and pantry swaps
- If scallops are wet, splash them with salt to draw out moisture quickly.
- When pan smokes excessively, patch with a splash of water to reduce heat flare.
- Dumped oil too hot? Rescue with a paper towel to absorb excess and lower temperature.
- Overcooked scallops? Shield with a quick lid cover to retain moisture and stop cooking.
- Pan shimmers dull? Swap with a fresh drizzle of oil for a shiny, crackling sear.
Prep, store, and reheat tips
- Dry scallops thoroughly with paper towels at least 30 minutes before cooking to ensure a crisp sear and avoid sogginess.
- Store cleaned and dried scallops in an airtight container in the fridge for up to 24 hours; keep them on ice if planning to serve within a few hours.
- Avoid marinating scallops for too long; their delicate flavor can become overwhelmed, but a quick squeeze of lemon or herbs can be prepared ahead and added just before serving.
- Reheat cooked scallops gently in a low-temperature oven or microwave, but best enjoyed fresh for optimal texture and flavor—reheating may cause moisture loss and rubberiness.
- For leftovers, store in an airtight container in the fridge for up to 1 day; reheat briefly in a hot pan, watching for texture changes—look for a slight shimmer and tender bite.
Top questions about pan seared scallops
1. How do I choose good scallops?
Look for scallops that feel firm and dry—avoid slimy or overly wet ones. Freshness boosts sear quality and flavor.
2. Should I dry scallops before cooking?
Pat them thoroughly with paper towels to remove moisture. Excess water prevents proper searing and makes scallops soggy.
3. What oil is best for searing scallops?
Use high-smoke-point oil like grapeseed or canola. It heats quickly, crisps nicely, and won’t burn at high temps.
4. How long should I sear scallops?
Cook in a hot pan until they develop a golden crust, about 2-3 minutes per side. They should be opaque and slightly springy.
5. Can I cook multiple scallops at once?
Ensure they are not overcrowded. Space them out in the pan to prevent steaming and promote even browning.
6. When should I serve scallops after cooking?
Serve immediately after cooking for the best crispy texture and tender interior. A squeeze of lemon adds brightness.
7. Why are my scallops sticking to the pan?
If scallops stick, give them more time. They’ll release easily once a golden crust forms—don’t force them early.
8. Should I add butter during searing?
Use a combination of butter and oil at the end for flavor and shine, but don’t overdo the butter to avoid sogginess.
9. How do I prevent overcooking scallops?
The key is moisture control—dry scallops sear better. Keep the heat just right—hot enough to crisp, not burn.
10. Can I reheat scallops?
Reheat gently in a warm pan or low oven to maintain tenderness. Avoid microwaving to prevent rubberiness.
There’s something quietly satisfying about pulling perfectly seared scallops from the pan, crispy on the outside, tender inside. It’s a small win in the kitchen that feels like a secret only a few know. These moments of confidence remind me why I keep coming back to simple techniques that deliver big flavor.
In the end, it’s about those fleeting moments — that sizzle, that golden crust, the burst of juice with each bite. No matter how often I cook them, I still get a little thrill when everything comes together just right. It’s a dish that rewards patience and attention, especially in busy times.

Hi, I’m Michael Anderson, the voice behind Overreacting To Salt. Yes, the name usually gets a laugh. And no, I am not actually afraid of salt. In fact, understanding salt and flavor balance is what inspired this entire blog.
 The voice behind Overreacting To Salt. Yes, the name usually gets a laugh. And no, I am not actually afraid of salt. In fact, understanding salt and flavor balance is what inspired this entire blog.
Overreacting To Salt is my space to talk honestly about cooking mistakes, kitchen wins, and the small details that make a big difference in flavor. I created it for home cooks who want to understand food better without feeling intimidated.
The voice behind Overreacting To Salt. Yes, the name usually gets a laugh. And no, I am not actually afraid of salt. In fact, understanding salt and flavor balance is what inspired this entire blog.
Overreacting To Salt is my space to talk honestly about cooking mistakes, kitchen wins, and the small details that make a big difference in flavor. I created it for home cooks who want to understand food better without feeling intimidated.