
Colorful peppers have always felt like a blank canvas in my kitchen, a chance to turn chaos into something delicious. Stuffing them with cheese is simple, but I love how each pepper becomes its own little messy masterpiece, bursting with flavor and personality. It’s a dish that invites a bit of chaos—melty cheese, drips, and all—and somehow that makes it feel more real, more satisfying.
This recipe is less about perfection and more about embracing the imperfect. Sometimes the peppers crack open at the sides, cheese oozes out in unpredictable ways, but that’s part of the charm. It’s a messy, honest kind of cooking that feels like a little rebellion against the neat, tidy recipes we often see. And the smell—oh, the smell of melted cheese mingling with roasted peppers—is worth every messy bite.
Focusing on how the vibrant, colorful peppers can be a canvas for both comfort and chaos in the kitchen, turning a simple stuffed pepper into a personal expression of messy, flavorful joy.
Messy, Colorful Comfort
- Seeing a pepper split open and ooze cheesy goodness is oddly satisfying, like a tiny victory in messy cooking.
- I love how the smell of roasted peppers and melting cheese instantly transports me back to childhood summers.
- Messy, imperfect peppers remind me that sometimes, the best bites come from a little chaos in the kitchen.
- Nothing beats the feeling of pulling a bubbling, cheesy pepper out of the oven and knowing it’s just right.
- There’s a quiet pride in turning a simple pepper into a colorful, flavorful mess that everyone digs into happily.
Messy, Colorful Comfort
This recipe came together one chaotic evening when I had leftover roasted peppers and a fridge full of cheese that needed using up. I remembered how my grandma used to stuff peppers with a simple cheese mixture, but I wanted to add a bit more personality—something messy, a little wild. It’s funny how something so humble can become a dish that feels like a small rebellion in the kitchen, all gooey and imperfect but deeply satisfying. Now, I make it whenever I need a quick, honest comfort food that doesn’t fuss too much about perfection.
Historical & Cultural Tidbits
- This dish has roots in Mediterranean home cooking, where stuffed vegetables have long been a way to make the most of seasonal produce.
- Cheese-stuffed peppers became popular in Southern Italy, especially in regions where peppers and cheeses like ricotta and mozzarella are staples.
- In the American South, variations of stuffed peppers often include a mix of cheeses, breadcrumbs, and sometimes sausage, adding a hearty twist.
- The concept of stuffing vegetables with cheese dates back centuries, but the modern version with melting cheese and roasted peppers gained popularity with casual family dinners.
Ingredient breakdown: key components
- Bell peppers: I love choosing firm, brightly colored peppers—they bring a sweet, smoky aroma when roasted, and you can swap them for poblano or cherry peppers for a different kick.
- Cheese: A melty mix of mozzarella and sharp cheddar gives that gooey, golden crust. If you prefer a milder flavor, try Monterey Jack or even a splash of cream cheese for extra creaminess.
- Garlic: Minced garlic adds a punch of aroma that wakes up the cheese mixture. Use fresh for the best scent, or roasted garlic if you want a sweeter, mellow depth.
- Herbs: Fresh parsley or basil brighten up the richness. Dried herbs work in a pinch, but fresh makes the flavors pop and adds a bit of green freshness to every bite.
- Oil & Seasonings: Olive oil helps the peppers roast evenly and adds a subtle fruity note. Salt and pepper are your staples, but a pinch of smoked paprika or cumin can add a smoky warmth.
- Optional Fillings: Crumbled cooked sausage or cooked grains like quinoa turn these peppers into a more filling meal. Keep it simple or go wild with leftovers—your call.
- Topping: A sprinkle of grated cheese or breadcrumbs on top before baking creates a beautiful crust and extra crunch, so don’t skip this last layer of crispy goodness.
Spotlight on key ingredients
Bell peppers and cheese:
- Bell peppers: I pick firm, brightly colored peppers—they roast to a smoky, sweet aroma, and you can swap them for poblanos or cherry peppers for a different heat level.
- Cheese: A gooey mix of mozzarella and sharp cheddar creates that irresistible stretch. If you want a milder flavor, try Monterey Jack or add a splash of cream cheese for extra creaminess.
Notes for ingredient swaps
- Dairy-Free: Swap cheese for a blend of mashed avocado and nutritional yeast for a creamy, cheesy flavor without dairy.
- Vegan Cheese: Use store-bought vegan cheese shreds or make your own cashew-based cheese for a similar melty experience.
- Bell Peppers: Substitute with poblano or cherry peppers for a spicier, smoky kick or use zucchini boats for a milder option.
- Herbs: Fresh cilantro or chives can replace parsley or basil, adding a different herbal brightness.
- Oil & Seasonings: Try sesame oil for a nutty aroma or add a dash of hot sauce to the cheese mixture for extra heat.
- Cheese: Ricotta or goat cheese can replace mozzarella and cheddar for a different texture and tang, but expect less stretchiness.
- Breadcrumb Topping: Use crushed crackers or toasted oats for a gluten-free crunch alternative to traditional breadcrumbs.
Equipment & Tools
- Oven: To roast the peppers and melt the cheese.
- Baking sheet: To hold the peppers during roasting.
- Mixing bowl: To combine cheese and herbs.
- Spoon or spatula: To stuff and top the peppers.
- Knife: To slice tops off peppers and prep ingredients.
- Paring knife or small spoon: To remove seeds and membranes from peppers.
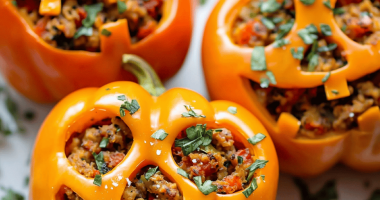
Step-by-step guide to stuffed peppers
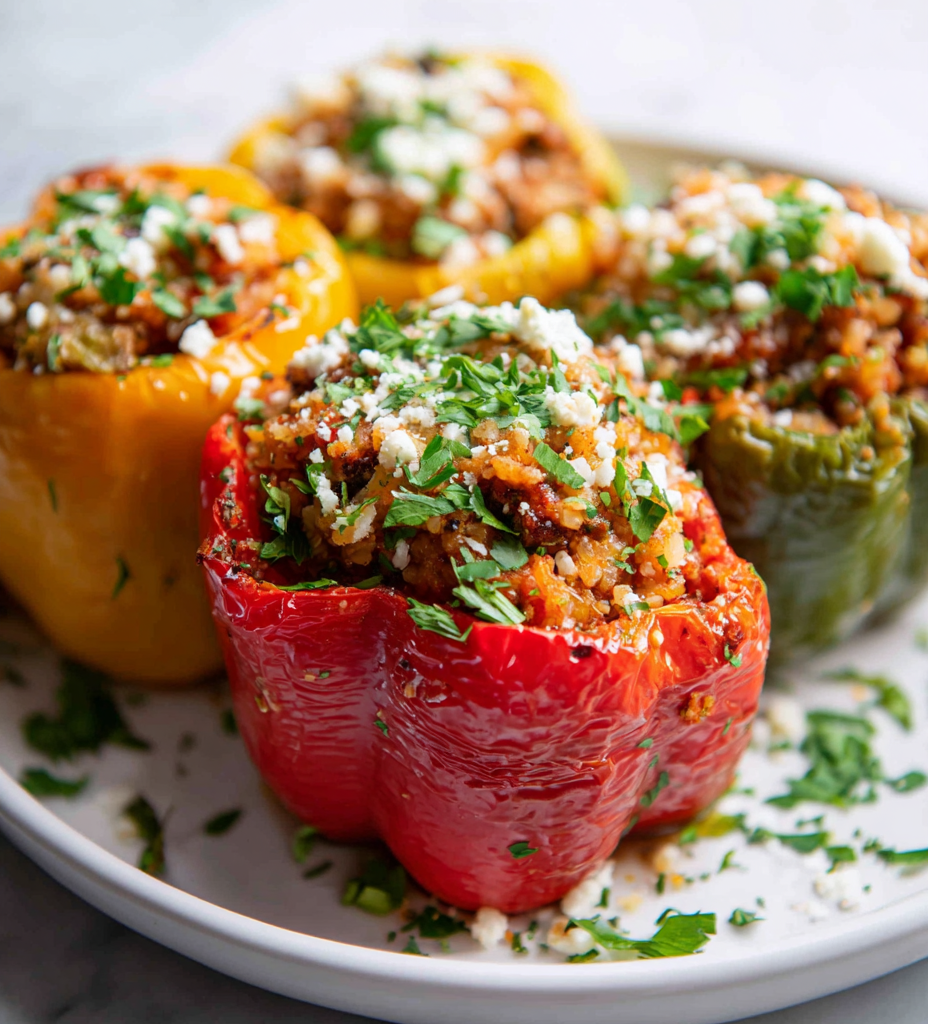
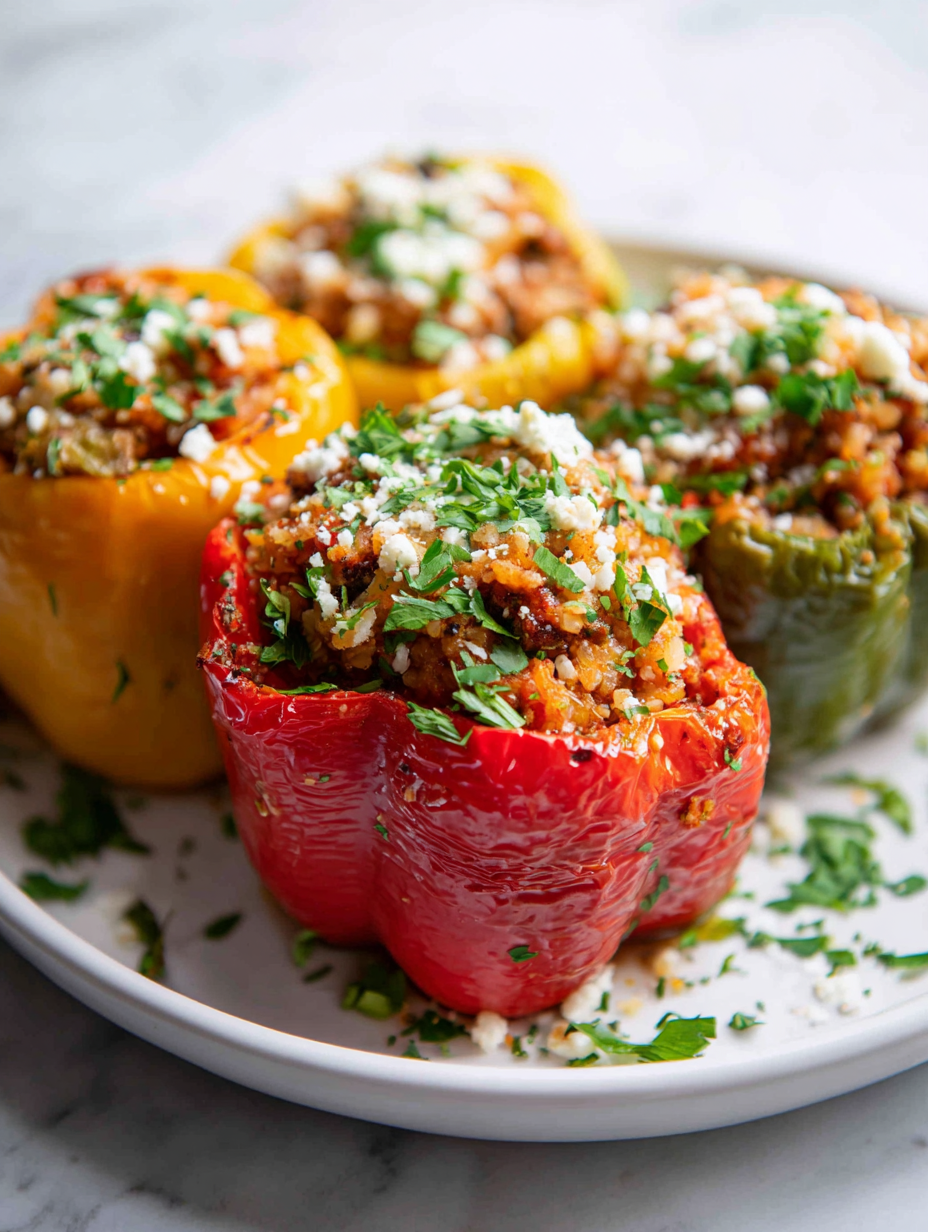
- Preheat your oven to 200°C (400°F). Slice the tops off 4 large bell peppers, removing seeds and membranes. Place them cut-side up on a baking sheet lined with parchment paper.
- In a small bowl, combine 1 cup shredded mozzarella, ½ cup grated sharp cheddar, 2 minced garlic cloves, and chopped fresh parsley. Mix well—this will be your cheesy filling.
- Drizzle the peppers with 1 tablespoon olive oil, then season with salt and pepper. Roast in the oven for 15 minutes until slightly softened and starting to blister; this makes them easier to stuff.
- While peppers roast, prepare the filling. Stuff each pepper generously with the cheese mixture, pressing down slightly to pack it in. If you like, add cooked sausage or grains at this stage for extra heartiness.
- Top each stuffed pepper with a sprinkle of additional cheese or breadcrumbs for a crispy crust. Return to the oven and bake for another 10-12 minutes, until the cheese is bubbly and golden.
- Remove from oven and let rest for 5 minutes. The cheese will settle, and the peppers will finish softening. Serve warm, with a drizzle of olive oil or a sprinkle of fresh herbs if desired.
Let the peppers rest for 5 minutes to allow the cheese to set. Plate them whole or halve them for easier eating. Drizzle with olive oil or garnish with herbs for presentation.
How to Know It’s Done
- Peppers are tender and slightly charred around the edges.
- Cheese is melted and bubbling, with a golden crust on top.
- Peppers feel soft when pierced with a fork, but still hold their shape.
Messy, Colorful Stuffed Peppers
Ingredients
Equipment
Method
- Preheat your oven to 200°C (400°F). Slice the tops off each bell pepper and carefully remove seeds and membranes with a paring knife or small spoon. Place the peppers cut-side up on a parchment-lined baking sheet.
- In a mixing bowl, combine the shredded mozzarella, grated cheddar, minced garlic, and chopped parsley. Mix until evenly blended—you'll smell the garlic and see the herbs brightening the cheesy mixture.
- Drizzle the cut peppers with olive oil, then sprinkle with a little salt and pepper. Roast them in the oven for about 15 minutes until they start to soften and blister around the edges—this helps make stuffing easier and adds flavor.
- Remove the peppers from the oven and carefully stuff each with the cheese mixture, pressing lightly to pack it in. If you'd like, add cooked sausage or grains at this stage for extra heartiness—just layer it inside before topping with cheese.
- Top each stuffed pepper with a sprinkle of breadcrumbs and a little more cheese if desired. This creates a crispy, golden crust when baked again.
- Return the peppers to the oven and bake for another 10-12 minutes until the cheese is bubbling and golden brown, and the peppers are soft and slightly charred around the edges—listen for the gentle bubbling and smell the cheesy aroma filling your kitchen.
- Remove the peppers from the oven and let them rest for about 5 minutes. This allows the cheese to set slightly, making them easier to serve without too much mess.
- Garnish with extra chopped parsley if desired, then serve the peppers whole or halved for easy eating. The cheese will be gooey and melty, with a crispy topping and tender peppers—perfect for messy, flavorful bites.
Notes
Pro tips for cheese stuffed peppers
- Use oven mitts: Handle hot peppers carefully—they’re easier to manage and prevent burns during roasting.
- Pre-roast for easier stuffing: Slightly softening peppers first makes stuffing and baking less messy and more even.
- Cheese layering: Pack the cheese firmly to prevent it from melting out too quickly or burning on top.
- Broil for a crispy top: Finish under the broiler for 1-2 minutes to get a bubbly, golden crust—watch closely to avoid burning.
- Rest before serving: Let the peppers sit for 5 minutes out of the oven; this helps the cheese set and prevents spills.
- Use a silicone spatula: Gently scrape out any cheese that oozes out during baking—keeps your pan clean and cheese in check.
- Add herbs at the end: Sprinkle fresh herbs after baking for a bright flavor contrast and vibrant color.
Common mistakes and how to fix them
- FORGOT to check pepper doneness → Test for softness and slight char at edges.
- DUMPED cheese mixture → Ensure cheese is evenly distributed inside peppers.
- OVER-TORCHED peppers → Cover with foil if cheese turns too dark before melting.
- MISSED resting time → Let peppers sit 5 minutes for cheese to set properly.
Quick fixes and pantry swaps
- When peppers crack open, patch with a bit of cheese and continue baking.
- Splash a little water on the baking sheet if cheese spills over, to prevent burning smoke.
- Dumped cheese? Scoop it back into peppers or sprinkle extra on top before broiling.
- Over-torched cheese? Cover with foil and lower oven temp to save the dish.
- Shield peppers from direct heat if they brown too quickly, preserving softness and flavor.
Prep, store, and reheat tips
- Prepping the cheese mixture and roasting peppers can be done a day in advance; store airtight in the fridge, and the flavors meld together nicely overnight, making assembly quicker on busy days.
- Assemble the stuffed peppers ahead of time, then refrigerate for up to 24 hours. The peppers may release some moisture, so place them on a rack or paper towel to absorb excess liquids before baking.
- Leftover stuffed peppers keep well in the fridge for 2-3 days. Reheat in the oven at 180°C (350°F) until bubbly—about 10-15 minutes. The cheese might thicken; a quick blast of heat restores gooeyness, releasing that smoky, cheesy aroma.
- Freezing is possible—wrap individual peppers tightly in plastic wrap, then foil. They keep for 1-2 months. Reheat directly from frozen in the oven at 180°C (350°F) for about 20-25 minutes, until heated through and the cheese bubbles. Expect slightly less fresh flavor, but still satisfying.
Top questions about cheese stuffed peppers
1. What peppers work best for stuffing?
Use peppers that are firm and brightly colored for the best roasting flavor and texture. Red, yellow, or orange peppers add sweetness and vibrancy.
2. Which cheeses are ideal for stuffing?
Choose cheeses like mozzarella and cheddar for melty goodness. Feel free to mix in cream cheese or Monterey Jack for extra creaminess.
3. Should I pre-roast the peppers?
Pre-roasting peppers makes them softer and easier to stuff. Roast at 200°C (400°F) until slightly blistered, about 15 minutes.
4. How do I know when the peppers are done?
Bake the stuffed peppers until cheese is bubbly and golden, usually 10-12 minutes after stuffing. Check for a slight char and softness.
5. Can I make these in advance?
You can prepare the cheese filling and roast peppers a day ahead. Store in the fridge and assemble just before baking for fresh, gooey results.
6. What if the cheese overflows or burns?
If cheese spills over or burns, cover with foil and lower the oven temperature slightly. Use a splash of water on the pan to prevent smoke.
7. How do I get a crispy cheese topping?
Finish the dish with a quick broil for a crispy, bubbling top. Keep a close eye for 1-2 minutes to avoid burning.
8. Are there good dairy-free options?
Substitute with vegan cheeses or dairy-free options like mashed avocado mixed with nutritional yeast for a similar creamy effect.
9. Can I customize the peppers?
Using poblano peppers adds a smoky kick, while zucchini boats give a milder, lighter version. Choose based on your spice preference.
10. What if the peppers crack or cheese burns?
When peppers crack open, patch with cheese and continue baking. If cheese burns, cover with foil and lower the heat to save it.
This dish is a reminder that beauty and chaos can coexist in the kitchen, and sometimes the messiest, most imperfect bites are the most memorable. It’s a straightforward way to bring vibrant flavor and a bit of wild joy to your table, especially when you’re craving comfort with a little edge. No matter how you tweak it, I promise the smell of melted cheese and roasted peppers will keep drawing you back for more.
In the end, these cheese-stuffed peppers aren’t just about the ingredients—they’re about the messy, flavorful moments we chase in our own kitchens. They’re perfect for a quick weeknight dinner or a casual gathering where everyone can dig in with their hands. And honestly, that’s exactly the kind of cooking I want to keep coming back to—honest, imperfect, and utterly satisfying.

I grew up in a small town in Oregon, United States. After years of experimenting (and failing) with recipes, I realized food wasn’t just about cooking—it was about connection.