
These baked veggie nuggets started as a way to make sneaking greens into my kid’s lunchbox feel less like a battle and more like a little treat. There’s something satisfying about crispy edges and warm, tender insides that makes even skeptical eaters reach for seconds. Plus, baking keeps the kitchen mess manageable and the smell cozy, not overwhelming.
Honestly, I love how versatile this recipe is—swap out whatever vegetables you have on hand, and they always turn out good. They’re not overly processed or greasy, just simple, honest ingredients transformed into a snack or meal. Making them in batches means I always have something healthy on hand, whether it’s for quick snacks or a last-minute dinner side.
This recipe turns the usual veggie nugget idea into a cozy, oven-baked comfort food that’s perfect for making in batches and sneaking extra vegetables into picky eaters’ plates without the fuss.
The story behind this recipe
- This recipe was born from a cluttered fridge and a desire to make veggie snacks that my kids would actually ask for. I wanted something crispy, cheesy, but still packed with vegetables—no fuss, no pretense.
- One rainy afternoon, I threw together what I had: leftover carrots, zucchini, and some breadcrumbs. The smell of roasting veggies mixed with the toasty aroma of baking cheese, and I realized I’d found a keeper. Now, it’s become a go-to for quick lunches and sneaky veggie wins.
- heading: “The story behind this recipe”
Ingredient breakdown: key components
- Cauliflower: I love how it becomes tender and almost creamy when roasted, giving a subtle earthy flavor. Swap with broccoli if you want a slightly more bitter note.
- Carrots: They add a natural sweetness and vibrant color. If you prefer milder flavor, use parsnips instead, which bring a similar sweetness but a softer bite.
- Breadcrumbs: I use plain panko for extra crunch, but if you’re out, crushed cornflakes work surprisingly well—just watch the salt levels.
- Cheese: Sharp cheddar melts into a gooey, smoky richness that ties everything together. For a dairy-free version, nutritional yeast adds a cheesy umami without the melt, but it’s less gooey.
- Eggs: They act as the glue, making sure everything sticks together. If you’re vegan, flaxseed meal mixed with water can do the trick, though it might be a bit denser.
- Olive oil: Brushed on the nuggets before baking it gives a nice golden sheen and crispy edges. You could substitute with avocado oil for a milder flavor and similar crisping power.
- Herbs & spices: I keep it simple—paprika for smoky warmth, garlic powder for depth. Feel free to add a pinch of cayenne if you like a kick of heat, or fresh herbs for brightness.
Spotlight on key ingredients
Cauliflower:
- I love how it becomes tender and almost creamy when roasted, giving a subtle earthy flavor. Swap with broccoli if you want a slightly more bitter note.
- Carrots: They add a natural sweetness and vibrant color. If you prefer milder flavor, use parsnips instead, which bring a similar sweetness but a softer bite.
- Breadcrumbs: I use plain panko for extra crunch, but if you’re out, crushed cornflakes work surprisingly well—just watch the salt levels.
Cheese & Eggs:
- Cheese: Sharp cheddar melts into a gooey, smoky richness that ties everything together. For a dairy-free version, nutritional yeast adds a cheesy umami without the melt, but it’s less gooey.
- Eggs: They act as the glue, making sure everything sticks together. If you’re vegan, flaxseed meal mixed with water can do the trick, though it might be a bit denser.
- Olive oil: Brushed on the nuggets before baking it gives a nice golden sheen and crispy edges. You could substitute with avocado oil for a milder flavor and similar crisping power.
Notes for ingredient swaps
- Dairy-Free: Use plant-based cheese and flaxseed eggs. The nuggets will still be tasty but slightly less gooey.
- Gluten-Free: Swap breadcrumbs for crushed rice cereal or gluten-free panko. Expect a slightly softer crust.
- Vegan: Replace cheese with nutritional yeast and eggs with a flaxseed meal mixture. Keep in mind, texture may be a bit denser.
- Low-Sodium: Use unsalted breadcrumbs and reduce added salt. Vegetables will shine more in the flavor profile.
- Extra Crunch: Incorporate crushed nuts or seeds into the breadcrumb coating for added texture and nuttiness.
- Spicy Kick: Mix in cayenne or chili flakes into the breadcrumb mixture for a fiery twist.
- Herb Variations: Swap out paprika for smoked paprika or add chopped fresh herbs like parsley or basil for a fresh aroma.
Equipment & Tools
- Baking sheet: To hold the nuggets during baking and ensure even heat transfer.
- Parchment paper or silicone mat: Prevents sticking and makes cleanup easier.
- Grater or food processor: To finely grate or pulse vegetables for uniform texture.
- Mixing bowl: To combine all ingredients evenly.
- Ice cream scoop or spoon: To shape uniform nuggets quickly.
- Pastry brush: To lightly coat nuggets with oil for crisping.
Step-by-step guide to veggie nuggets
- Preheat your oven to 200°C (390°F). Line a baking sheet with parchment paper or a silicone mat to prevent sticking.
- Prepare the vegetables: Finely grate or pulse cauliflower, carrots, zucchini, and any other veggies you’re using. Aim for small, uniform pieces for even cooking.
- In a large bowl, combine the grated vegetables with breadcrumbs, grated cheese, beaten eggs, and spices. Mix until well incorporated. If the mixture feels too loose, add a bit more breadcrumbs.
- Shape the mixture into nugget-sized portions, about 2 inches long and 1 inch thick. Use your hands or a small ice cream scoop for consistency.
- Place the nuggets on the prepared baking sheet, leaving a little space between each. Brush lightly with olive oil for extra crispness.
- Bake in the preheated oven for 20-25 minutes. Check after 15 minutes and rotate the sheet for even browning.
- The nuggets are ready when they’re golden brown around the edges, and the tops are crisp. The vegetables should smell roasted and savory.
- Remove from the oven and let rest for 5 minutes. This helps them firm up, making them easier to serve without falling apart.
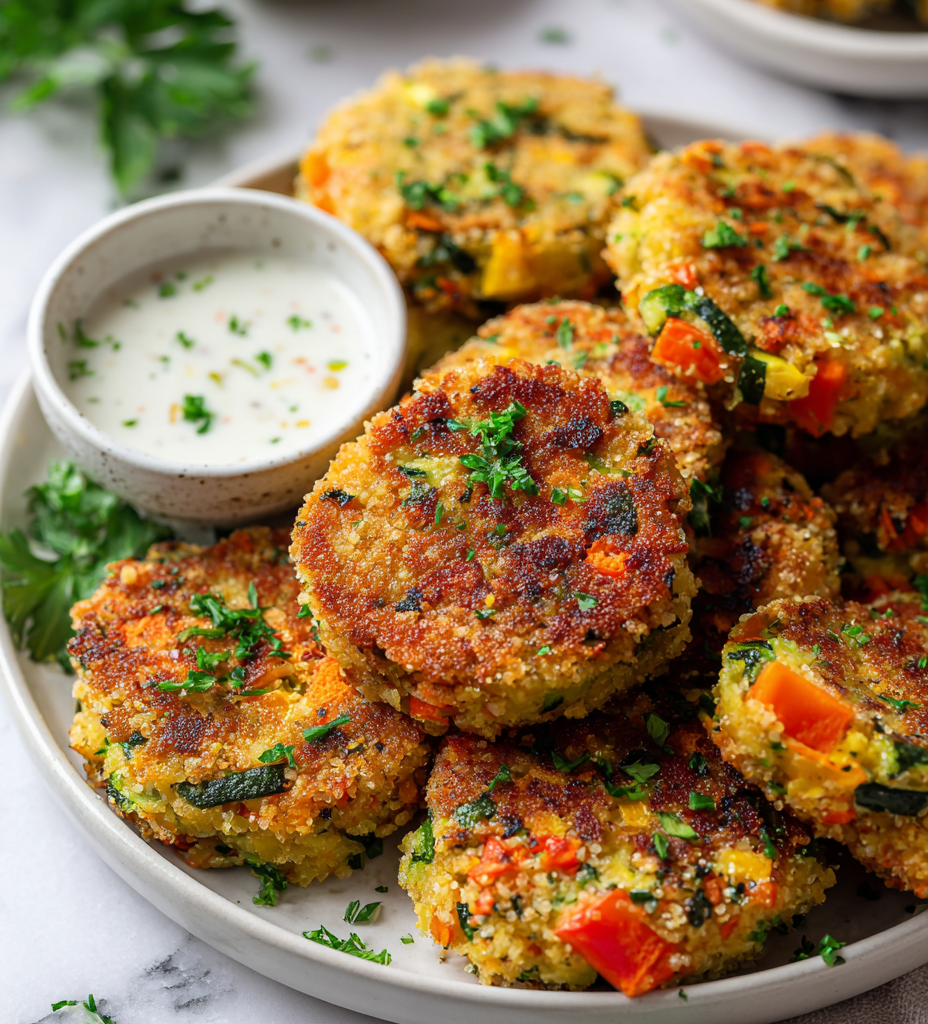
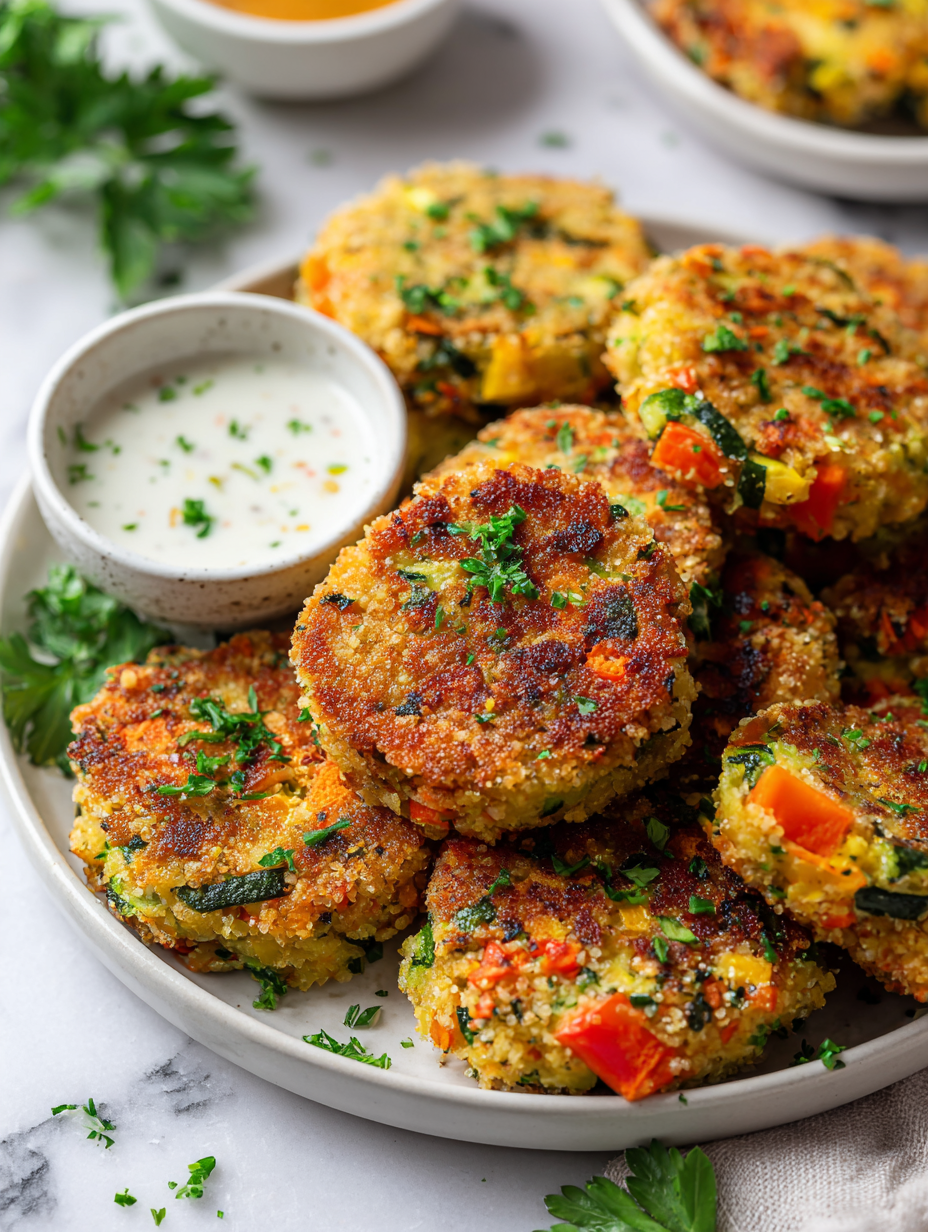
- Serve warm with your favorite dip or cool for a snack. They should be crispy on the outside, tender inside, and packed with veggie flavor.
Let the baked nuggets rest on the sheet for 5 minutes to set. Serve warm or at room temperature, plated with a side of dip or just as they are. They’re best eaten fresh but keep well in an airtight container for up to 2 days and reheat in a 180°C (350°F) oven until crispy again.
How to Know It’s Done
- Nuggets are golden and crispy on the outside.
- Vegetables are tender and slightly caramelized.
- They hold their shape when gently pressed, not too soft or crumbly.
Baked Veggie Nuggets
Ingredients
Equipment
Method
- Preheat your oven to 200°C (390°F) and line a baking sheet with parchment paper or a silicone mat.
- Finely grate or pulse the cauliflower florets and carrots until they resemble small crumbs or rice-sized pieces. This creates a uniform, tender base for the nuggets.
- In a large mixing bowl, combine the grated vegetables with the breadcrumbs, grated cheese, paprika, garlic powder, and beaten egg. Mix everything together until well integrated and the mixture feels cohesive.
- Using your hands or an ice cream scoop, shape the mixture into small nuggets about 2 inches long and 1 inch wide. Press gently to compact them, ensuring they hold together well.
- Arrange the shaped nuggets on the prepared baking sheet, spacing them evenly. Brush the tops lightly with olive oil using a pastry brush for a golden, crispy finish.
- Bake the nuggets in the preheated oven for 20 to 25 minutes, flipping them halfway through for even browning. They should turn a deep golden brown and develop crispy edges.
- Remove the nuggets from the oven and let them rest for 5 minutes on the baking sheet. This helps them set and prevents them from falling apart when served.
- Serve the veggie nuggets warm, with your favorite dipping sauce or as a side. They should be crispy on the outside and tender inside, with a flavorful vegetable taste.
Pro tips for perfect veggie nuggets
- Use a light hand when coating with oil—too much can make the nuggets greasy.
- Chill the mixture for 10 minutes before shaping—this helps everything hold together better.
- Bake on the middle rack for even browning and crisp edges.
- Turn the nuggets halfway through baking—this ensures uniform color and crunch.
- For extra crispiness, broil for the last 2 minutes—watch closely to prevent burning.
- Use a silicone mat or parchment paper—prevents sticking and makes cleanup a breeze.
- Rest the baked nuggets for 5 minutes—this helps them firm up before serving.
Common mistakes and how to fix them
- FORGOT to pat vegetables dry? Squeeze out excess moisture to prevent soggy nuggets.
- DUMPED too much oil? Use a light brush for crispiness without greasiness.
- OVER-TORCHED edges? Rotate the tray halfway through baking for even browning.
- FAILED to check doneness? Nuggets should be crispy outside and tender inside.
Quick fixes and pantry swaps
- When the nuggets stick, splash a little more oil or parchment for easy removal.
- If mixture feels loose, open a pantry drawer and grab some crushed cereal for quick binding.
- DUMPED too much salt? Rinse the mixture briefly with cold water and re-mix with fresh ingredients.
- When edges burn, shield with foil and lower oven temperature to prevent further charring.
- Splash a little lemon juice or vinegar if the nuggets taste flat or dull.
Prep, store, and reheat tips
- Prep the vegetable mixture ahead: grate and mix the veggies with spices up to a day in advance; keep refrigerated and covered to prevent drying out, sensory cue: fresh, earthy aroma.
- Assemble and shape nuggets: form into portions and freeze on a tray, then transfer to an airtight container; they’ll keep for up to 2 months, sensory cue: firm, not sticky.
- Refrigerate cooked nuggets: store in an airtight container for up to 2 days; reheat in oven at 180°C (350°F) until crispy, sensory cue: sizzling, golden edges.
- Reheat straight from freezer: bake directly on a lined sheet for 10-15 minutes; expect a crackling crust and warm, tender interior, sensory cue: crispy outside, steamy inside.
Top questions about veggie nuggets
1. How do I keep the nuggets from falling apart?
Use a food processor or grate the vegetables finely to ensure even cooking and easy shaping.
2. Can I prepare the mixture ahead of time?
Chill the mixture for 10 minutes before shaping; it firms up and makes handling easier.
3. How do I know when they’re done?
Bake at 200°C (390°F) until golden and crispy, about 20-25 minutes, flipping halfway.
4. What’s the best way to prevent sticking?
Use parchment paper or a silicone mat to prevent sticking and ensure crisp edges.
5. My mixture is too sticky—what now?
If the mixture feels too loose, add more breadcrumbs until it holds shape without being dry.
6. How can I make them crispier?
For a crispier crust, brush the nuggets lightly with oil before baking and broil for 2 minutes at the end.
7. How should I store and reheat leftovers?
Store leftovers in an airtight container in the fridge for up to 2 days, then reheat in a hot oven.
8. Can I freeze these for later?
You can freeze shaped nuggets on a tray, then transfer to a bag for up to 2 months; bake from frozen.
9. How do I prevent the nuggets from becoming greasy?
Use a gentle hand when coating with oil to avoid greasy nuggets. A light brushing is enough.
10. Can I customize the flavor?
Adjust spices or add fresh herbs to suit your taste—try smoked paprika or chopped parsley.
These baked veggie nuggets aren’t just a quick snack—they’re a little reminder that simple ingredients can turn into something satisfying. Baking them makes the house smell warm and toasty, a scent that sticks around long after they’re gone.
Whenever I make a batch, I’m reminded of how easy it is to sneak more vegetables into our meals without fuss. They’re imperfectly perfect, a bit rustic, and always a hit whether served with a dip or just on their own.

I grew up in a small town in Oregon, United States. After years of experimenting (and failing) with recipes, I realized food wasn’t just about cooking—it was about connection.