
Baking chicken skewers might sound simple, but there’s something unexpectedly cozy about it. No need for a grill, just your oven and a few good spices, and you’re set for a smoky, tender bite. I’ve always loved the way baking brings out a deeper flavor—more caramelized edges, less fuss, more flavor in every bite.
This method is perfect for busy weeknights or when the weather keeps you inside. It’s forgiving too—no flare-ups or uneven cooking—just a steady heat that crisps the outside while keeping the chicken juicy inside. Plus, it’s a great way to get everyone involved—kids love threading the skewers, and it feels like a little celebration at the dinner table.
What really makes this recipe stand out is how adaptable it is. You can toss in your favorite herbs, spice blends, or even switch up the veggies on the skewers. It’s honest, straightforward cooking, meant to be enjoyed with no fuss but packed with flavor—exactly the kind of meal that feels like a small victory after a long day.
Focusing on the overlooked charm of baking chicken skewers for a fuss-free, smoky flavor that rivals grilling, perfect for cozy nights when fire isn’t an option.
The story behind this recipe
- I stumbled on this recipe during a chilly autumn weekend, trying to make something warm and fuss-free for friends dropping by unexpectedly. The smell of smoky marinated chicken filling the oven made the whole house feel like a small celebration. It’s one of those dishes that came together by accident but stuck around for good.
- Once, I was rushing through dinner prep, frustrated with how long grilling takes in bad weather. I threw the skewers into the oven on a whim, and the result was so unexpectedly delicious—juicy chicken with crispy edges, smoky and tender all at once—that I kept it in my regular rotation. It’s a reminder that sometimes, simple is best, especially when you’re short on time but still crave flavor.
- heading
- story_type
Ingredient breakdown: key components
- Chicken breasts: I prefer boneless, skinless because they stay juicy and cook evenly; you can swap with thighs if you like a richer, slightly fattier bite.
- Olive oil: I use a good-quality extra virgin for that fruity aroma; if you’re out, a neutral oil like avocado works without losing flavor punch.
- Lemon juice: Brightens everything, almost zesty enough to make you smile. Skip it if you want milder skewers, but it’s the kick that makes it lively.
- Paprika: Smoked paprika is my go-to for that deep, smoky hue and flavor. Sweet paprika will give a milder taste if you prefer less intensity.
- Garlic powder: It’s a quick flavor boost, but if you’ve got fresh garlic, mince it and toss in—more pungent, more alive on the palate.
- Herbs: I love chopped oregano or thyme—fresh if you’ve got them. Dried works too, just remember it’s more concentrated, so use less.
- Vegetables: Bell peppers or onions add color and crunch, but keep them in chunks not slices—better for skewering and eating with your hands.
Spotlight on key ingredients
Chicken breasts:
- I prefer boneless, skinless because they stay juicy and cook evenly; you can swap with thighs if you like a richer, slightly fattier bite.
- Olive oil: I use a good-quality extra virgin for that fruity aroma; if you’re out, a neutral oil like avocado works without losing flavor punch.
- Lemon juice: Brightens everything, almost zesty enough to make you smile. Skip it if you want milder skewers, but it’s the kick that makes it lively.
Paprika and garlic powder:
- Paprika: Smoked paprika is my go-to for that deep, smoky hue and flavor. Sweet paprika will give a milder taste if you prefer less intensity.
- Garlic powder: It’s a quick flavor boost, but if you’ve got fresh garlic, mince it and toss in—more pungent, more alive on the palate.
Notes for ingredient swaps
- Chicken breasts: I prefer boneless, skinless because they stay juicy and cook evenly; you can swap with thighs if you like a richer, slightly fattier bite.
- Olive oil: I use a good-quality extra virgin for that fruity aroma; if you’re out, a neutral oil like avocado works without losing flavor punch.
- Lemon juice: Brightens everything, almost zesty enough to make you smile. Skip it if you want milder skewers, but it’s the kick that makes it lively.
- Paprika: Smoked paprika is my go-to for that deep, smoky hue and flavor. Sweet paprika will give a milder taste if you prefer less intensity.
- Garlic powder: It’s a quick flavor boost, but if you’ve got fresh garlic, mince it and toss in—more pungent, more alive on the palate.
- Herbs: I love chopped oregano or thyme—fresh if you’ve got them. Dried works too, just remember it’s more concentrated, so use less.
- Vegetables: Bell peppers or onions add color and crunch, but keep them in chunks not slices—better for skewering and eating with your hands.
Equipment & Tools
- Baking sheet: To hold skewers and bake evenly
- Mixing bowl: For marinating the chicken
- Skewers (wooden or metal): To thread chicken and veggies
- Parchment paper or silicone mat: To prevent sticking and make cleanup easier
- Tongs: To handle skewers and turn them
Step-by-step guide to baked skewers
- Preheat your oven to 200°C (400°F). Line a baking sheet with parchment or a silicone mat for easy cleanup.
- Prepare skewers: If using wooden skewers, soak them in water for 20 minutes to prevent burning. Metal skewers need no prep.
- Cut chicken breasts into 1.5-inch chunks. Marinate: Mix olive oil, lemon juice, garlic powder, paprika, salt, and pepper. Toss chicken in marinade. Let sit 15 minutes—no more, no less.
- Thread chicken pieces onto skewers, alternating with chunks of bell peppers or onions if desired. Keep pieces snug but not too cramped.
- Arrange skewers on the prepared baking sheet, leaving space between each for even heat. Bake in the middle rack for 15 minutes.
- Check for color: edges should be golden and slightly caramelized. Flip skewers and bake for an additional 10 minutes.
- Final check: Chicken should be firm, juices run clear when pierced, and internal temp hits 75°C (165°F). If not, bake 2-3 more minutes.
- Remove from oven, let rest 5 minutes. Resting keeps juices in. Serve hot, garnished with fresh herbs if you like.
Let the skewers rest for 5 minutes on a plate. Then, serve with your favorite sides—rice, salad, or crusty bread. Garnish with chopped herbs for a fresh touch.
How to Know It’s Done
- Juices run clear when pierced with a skewer
- Internal temperature reaches 75°C (165°F)
- Edges are golden and slightly caramelized
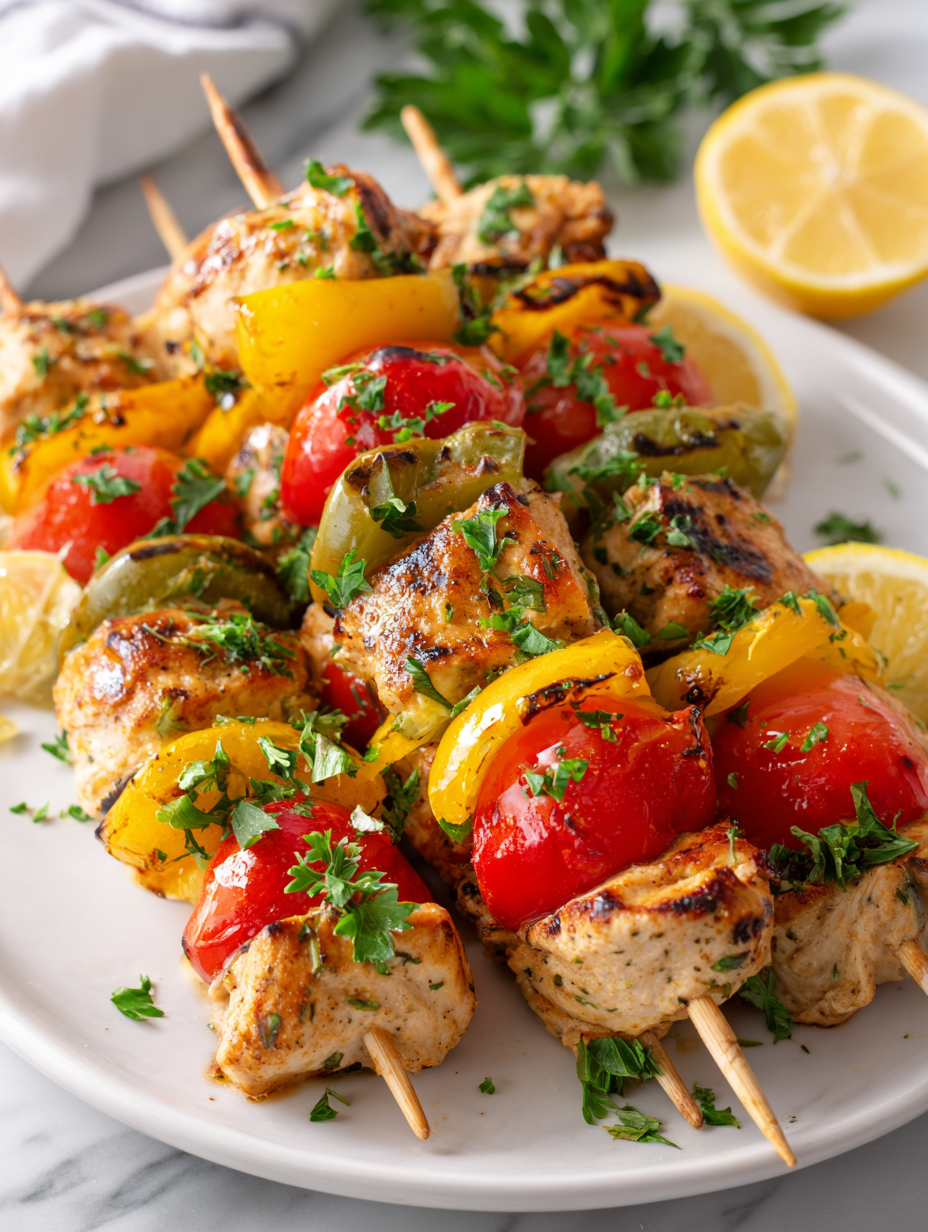
Baked Chicken Skewers
Ingredients
Equipment
Method
- Preheat your oven to 200°C (400°F) and line a baking sheet with parchment paper or a silicone mat to prevent sticking.
- Soak wooden skewers in water for 20 minutes to prevent burning, or prepare metal skewers if using those.
- In a mixing bowl, toss the chicken chunks with olive oil, lemon juice, garlic powder, paprika, chopped herbs, salt, and pepper. Let this marinate for about 15 minutes to develop flavor and keep the meat juicy.
- Thread the marinated chicken pieces onto skewers, alternating with chunks of bell peppers and onions if desired, ensuring the pieces are snug but not overcrowded.
- Arrange the skewers on the prepared baking sheet, leaving space between each for even cooking.
- Bake in the middle rack for 15 minutes, then carefully flip the skewers with tongs to promote even browning.
- Continue baking for another 10 minutes, until the edges are golden and slightly caramelized, and the chicken reaches an internal temperature of 75°C (165°F).
- Remove from the oven and let the skewers rest for 5 minutes to lock in juices.
- Serve the skewers hot, garnished with fresh herbs if desired, alongside your favorite sides like rice or salad.
Tips and tricks for perfect skewers
- Bolded mini-head: Soak wooden skewers for 20 minutes to prevent burning and ensure even cooking.
- Bolded mini-head: Marinate chicken for at least 15 minutes—this helps develop flavor and keeps the meat juicy.
- Bolded mini-head: Flip skewers halfway through baking for even caramelization and a smoky, golden crust.
- Bolded mini-head: Check for doneness by internal temp—75°C (165°F)—and by firm, clear juices.
- Bolded mini-head: Use high heat in the oven—around 200°C (400°F)—to achieve crisp, caramelized edges.
- Bolded mini-head: Rest skewers 5 minutes after baking; this keeps juices locked inside for tender bites.
- Bolded mini-head: Incorporate veggies like peppers or onions for color and crunch—thread in chunks for best results.
Common mistakes and how to fix them
- FORGOT to pre-soak wooden skewers → Soak for 20 minutes to prevent burning.
- DUMPED marinade too early → Let chicken marinate for at least 15 minutes for flavor.
- OVER-TOUCHED skewers during baking → Turn once, avoid opening oven frequently.
- UNDER-COOKED chicken → Confirm internal temp reaches 75°C (165°F).
Quick fixes and pantry swaps
- When skewers burn, splash with a little water and cover quickly to cool and soften.
- If chicken is too dry, patch with a brush of marinade before reheating for moisture and flavor.
- Splash lemon juice if skewers lack brightness—freshness helps lift the smoky notes.
- Patch uneven charring with a sprinkle of smoked paprika for a consistent smoky finish.
- Shield skewers with foil if edges over-torch—protects the meat from burning while finishing.
Prep, store, and reheat tips
- Marinate the chicken a day ahead in the fridge—keeps the meat flavorful and tender, with a slightly oozier marinade aroma.
- Assemble skewers up to 2 hours before baking; keep covered in the fridge to prevent drying out or odor absorption.
- Store cooked skewers in an airtight container in the fridge for up to 3 days; reheat in the oven at 180°C (350°F) for 10 minutes until sizzling and fragrant.
- Reheating will intensify the smoky aroma and keep the chicken juicy, but avoid overcooking to prevent dryness.
- For longer storage, freeze skewers wrapped tightly for up to 1 month; thaw in the fridge before reheating for best flavor.
Top questions about baked chicken skewers
1. Can I use different chicken cuts?
Use chicken breasts or thighs; thighs stay juicier but breasts are leaner. Both work fine, just adjust cooking time.
2. Do I need to soak the skewers?
Soak wooden skewers in water for 20 minutes to prevent burning. Metal skewers need no prep.
3. How long do I bake the skewers?
Bake at 200°C (400°F) for about 25-30 minutes total, flipping halfway. Look for golden edges and internal temp of 75°C (165°F).
4. How long should I marinate the chicken?
Marinate for at least 15 minutes; longer if possible. It boosts flavor and keeps the chicken juicy.
5. Can I substitute the paprika?
Use smoked paprika for a deep smoky flavor. If unavailable, regular paprika works but less smoky.
6. Can I prepare skewers in advance?
You can assemble skewers a couple of hours ahead, keep covered in the fridge, then bake when ready.
7. How do I reheat leftovers?
Reheat in the oven at 180°C (350°F) for 10 minutes. Keeps them juicy and crispy, avoid microwaving to prevent sogginess.
8. How do I know when skewers are done?
Look for juicy chicken, golden color, and internal temp of 75°C (165°F). Juices should run clear when pierced.
9. What herbs can I add?
Use fresh herbs like oregano or thyme for bright flavor. Dried herbs are fine but use less.
10. What if my skewers overburn or unevenly cook?
If skewers burn, splash with water and cover. For uneven charring, shield with foil or adjust oven rack.
Cooking these baked chicken skewers feels like a small act of rebellion—baking instead of grilling, turning to the oven for that smoky, roasted flavor. It’s honest, no-fuss food that reminds me there’s beauty in simplicity, especially on busy nights or when weather keeps the grill hidden.
And honestly, once you get the hang of it, it’s hard not to keep coming back. Nothing beats that smell of smoky chicken filling the house, crispy edges just starting to crackle, and a plate of skewers ready to be devoured. It’s one of those recipes that makes you feel a little proud, even if you’re just cooking for yourself.

I grew up in a small town in Oregon, United States. After years of experimenting (and failing) with recipes, I realized food wasn’t just about cooking—it was about connection.