There’s something about vintage snack shop cheese crackers that always pulls me back to childhood afternoons. The crunch, the cheesy aroma, that satisfying snap when you bite in — it’s a simple joy I’ve tried to recreate many times, but never quite captured until I started making them myself. Baking these at home means I get to tweak the salt, the cheese, and even the thickness to suit my mood that day.
What I love most is how these crackers turn out crisp and golden, with a rich, cheesy flavor that feels indulgent but totally doable in my own kitchen. They’re perfect for when I want a little nostalgic comfort without opening a bag of store-bought snacks. Plus, the process of mixing, rolling, and baking feels almost meditative, a small act of homemade indulgence.
Focusing on creating homemade cheese crackers that mimic vintage snack shop treats, emphasizing nostalgia and the joy of crafting snackable comfort food from scratch.
The story behind this recipe
- This recipe came about on a rainy afternoon when I was craving something crunchy and cheesy but wanted to avoid the grocery store. I started experimenting with simple pantry ingredients, aiming for that perfect balance of crispness and cheesy richness. The moment I pulled the first batch out of the oven and bit into one, I knew I was onto something. Homemade crackers just hit different, more vivid, more satisfying.
- The best part? They remind me of childhood snack treats, but with my own twist. Making them from scratch means I can control the salt, the cheese, even the thickness, tailoring each batch to my mood. It’s a small act of rebellion against the overly processed snacks I used to buy, and honestly, it’s become a bit of a cozy ritual.
- heading: ‘The story behind this recipe’
Ingredient breakdown
- Sharp cheddar: I love that tangy, slightly nutty flavor on the tongue, but you can swap with Monterey Jack for milder, creamier notes.
- Unsalted butter: It’s the backbone of that tender, flaky texture. If you only have salted, cut back on added salt in the dough.
- All-purpose flour: I prefer unbleached for a richer flavor, but plain white works perfectly—just watch the dough’s consistency if you tweak the flour type.
- Cheese powder (optional): Adds a cheesy punch without extra moisture, but you can omit it if you want a more straightforward cheesy taste.
- Salt: It’s the small pinch that makes the cheese pop, but if your cheese is very salty, reduce or skip to avoid over-seasoning.
- Paprika or smoked paprika: For a subtle smoky depth and a hint of color—if you like a little kick, go for hot paprika instead.
- Ice water: Keeps the dough pliable and tender, especially if your kitchen’s warm—use cold, not icy, water if the dough feels sticky.
Spotlight on key ingredients
Cheese:
- Sharp cheddar: I love that tangy, slightly nutty flavor on the tongue, but you can swap with Monterey Jack for milder, creamier notes.
- Unsalted butter: It’s the backbone of that tender, flaky texture. If you only have salted, cut back on added salt in the dough.
- All-purpose flour: I prefer unbleached for a richer flavor, but plain white works perfectly—just watch the dough’s consistency if you tweak the flour type.
Water & cheese powder:
- Ice water: Keeps the dough pliable and tender, especially if your kitchen’s warm—use cold, not icy, water if the dough feels sticky.
- Cheese powder (optional): Adds a cheesy punch without extra moisture, but you can omit it if you want a more straightforward cheesy taste.
Notes for ingredient swaps
- Dairy-Free: Swap cheddar with nutritional yeast or a dairy-free cheese alternative. Expect a slightly nuttier, less sharp flavor.
- Gluten-Free: Use a blend of rice flour, tapioca starch, and potato starch. The texture will be a bit crumblier but still tasty.
- Vegan: Replace butter with coconut oil or vegan margarine, and cheese with a plant-based cheese shreds. Keep an eye on the moisture content.
- Flavored Cheese: Add a pinch of garlic powder or smoked paprika to your cheese for extra depth. It’s a simple way to customize.
- Salt: Reduce or omit if your cheese is salted. Taste the dough before baking to avoid over-salting.
- Paprika: Use smoked paprika for a smoky kick, or skip entirely for a milder cracker.
- Ice Water: Use cold sparkling water to add a slight fizz and extra flakiness to the dough.
Equipment & Tools
- Baking sheet: To hold the crackers during baking.
- Parchment paper or silicone mat: For non-stick, easy release, and cleanup.
- Grater: To shred cheese finely for even melting and flavor distribution.
- Pastry cutter or fork: To cut in butter and combine ingredients.
- Rolling pin: To roll out dough evenly.
- Knife or cookie cutter: To shape crackers uniformly.
- Wire cooling rack: To cool crackers evenly and maintain crispness.
Step-by-step guide to baked cheese crackers
- Preheat your oven to 180°C (350°F). Line a baking sheet with parchment paper or a silicone mat for easy cleanup.
- In a mixing bowl, combine 1 1/2 cups all-purpose flour, 1/2 teaspoon salt, and 1/4 teaspoon smoked paprika if using. Whisk to blend.
- Grate 1 cup sharp cheddar cheese. Set aside a small handful for sprinkling later.
- Add 1/4 cup unsalted butter, cut into small pieces, to the dry ingredients. Use a pastry cutter or your fingers to cut the butter into the flour until the mixture resembles coarse crumbs.
- Stir in the grated cheese, then gradually add 2–3 tablespoons ice water, a little at a time, until the dough comes together and is pliable but not sticky. (If it’s too sticky, sprinkle with a little more flour; if too dry, add a splash more water.)
- Divide the dough in half. Wrap each piece in plastic wrap and chill in the fridge for 15–20 minutes to relax the gluten and firm up the butter.
- Remove one dough portion from the fridge. Lightly flour a clean surface and your rolling pin. Roll the dough out to about 2–3 mm (1/8 inch) thick, aiming for an even sheet.
- Use a sharp knife or a cookie cutter to cut the dough into squares, rectangles, or your preferred cracker shape. Transfer to the prepared baking sheet.
- Lightly brush the tops with a little water. Sprinkle with the reserved cheese for extra cheesy bits and a rustic look.
- Bake in the preheated oven for 12–15 minutes, or until the edges are golden and the crackers are crisp. Keep an eye on them after 10 minutes to prevent over-browning.
- Once baked, turn off the heat and let the crackers rest on the baking sheet for 2–3 minutes to firm up further. Then transfer to a wire rack to cool completely.
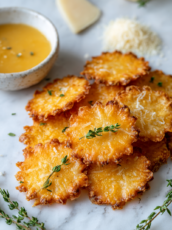
- Allow the crackers to cool for at least 10 minutes before breaking apart if needed. They should be crispy, golden, and aroma-rich with cheesy goodness.
Let the baked crackers cool completely on a wire rack. Store in an airtight container at room temperature for up to a week. Serve alongside cheese, dips, or enjoy on their own, with a glass of cold beverage.
How to Know It’s Done
- Crackers are golden and crisp around the edges.
- They produce a satisfying snap when broken.
- Cheese smells rich and toasted, with no raw dough scent.

Homemade Cheese Crackers
Ingredients
Equipment
Method
- Preheat your oven to 180°C (350°F) and line a baking sheet with parchment paper or a silicone mat.
- In a large mixing bowl, whisk together the flour, salt, and smoked paprika if using to evenly distribute the spices.
- Grate the sharp cheddar cheese finely with a grater, then add it to the dry ingredients.
- Add the cold unsalted butter, cut into small pieces, to the bowl. Use a pastry cutter or your fingers to cut the butter into the flour mixture until it resembles coarse crumbs with some pea-sized bits.
- Gradually pour in 2 tablespoons of ice water, mixing gently with a fork or spatula. Add more water, a teaspoon at a time, until the dough just comes together and feels pliable but not sticky.
- Divide the dough into two equal portions, wrap each in plastic wrap, and chill in the refrigerator for 15–20 minutes to relax the gluten and firm the butter.
- Remove one portion of dough from the fridge. Lightly flour a clean surface and your rolling pin, then roll out the dough to about 2–3 mm (1/8 inch) thickness into an even sheet.
- Use a knife or cookie cutter to cut the dough into small squares or your preferred shape. Transfer the cut crackers onto the prepared baking sheet.
- Lightly brush the tops of the crackers with a little water and sprinkle with reserved cheese for extra flavor and rustic appearance.
- Bake in the preheated oven for 12–15 minutes, or until the edges are golden brown and the crackers are crisp. Keep an eye on them after 10 minutes to prevent over-browning.
- Once baked, transfer the crackers to a wire rack and let them cool completely. They will become even crispier as they cool, with a rich cheesy aroma filling your kitchen.
Notes
Pro tips for crispy cheese crackers
- Bolded mini-head: Chill the dough thoroughly before rolling to prevent sticking and ensure crisp crackers.
- Bolded mini-head: Use a sharp knife or cookie cutter for clean, even edges that bake uniformly.
- Bolded mini-head: Watch the crackers carefully after 10 minutes; they can go from perfect to burnt quickly.
- Bolded mini-head: For extra crunch, bake until edges are deeply golden and crackle when you tap them.
- Bolded mini-head: Sprinkle cheese on top just before baking for a rustic, cheesy crust that stays put.
- Bolded mini-head: Rotate the baking sheet halfway through to promote even browning and prevent over-browning on one side.
- Bolded mini-head: Cool crackers completely on a wire rack to maintain maximum crispness and avoid sogginess.
Common mistakes and how to fix them
- FORGOT to chill dough → Rest dough in fridge for easier rolling and cleaner cuts.
- DUMPED cheese mixture → Fold cheese in gently to prevent losing melted texture.
- OVER-TORCHED crackers → Bake at the right temperature and check early to avoid burning.
- MISSED resting time → Let baked crackers rest to firm up and enhance crispness.
Quick fixes and pantry swaps
- When crackers are uneven, sprinkle with a little water and pat gently to even out the surface.
- If crackers are too pale, increase oven temperature slightly or bake for an extra 2 minutes for golden perfection.
- Splash a few drops of milk on crackers before baking to enhance browning and add a richer flavor.
- Patch cracked crackers with a tiny dab of dough to keep edges intact during baking.
- Shield over-browned crackers with foil after 10 minutes to prevent burning while finishing baking.
Prep, store, and reheat tips
- Prepare the dough in advance, wrap tightly, and chill for up to 24 hours—this deepens flavor and makes rolling easier.
- Store baked crackers in an airtight container at room temperature for up to 5 days; they stay crispy and cheesy-flavored with each day.
- For longer storage, freeze crackers in a sealed bag for up to 1 month; reheat in a 180°C (350°F) oven until warmed and crisp again, about 5 minutes.
- Reheating releases a lovely cheesy aroma; look for crackling sounds and a firm texture when they’re ready to enjoy again.
Top questions about baked cheese crackers
1. How do I know when baked cheese crackers are done?
Look for crackers that are golden around the edges and feel firm but not hard when you gently tap them. They should crackle when broken.
2. What if my crackers burn easily?
If they start to smell burnt or the edges turn too dark before the middle firms up, lower the oven temperature or reduce baking time.
3. How should the dough feel when mixed?
Use cold water to keep the dough pliable and prevent cracking. If dough feels dry, add a tiny splash more water, but don’t overdo it.
4. Can I make these thicker or thinner?
Yes, you can. Just roll them a little thinner for a crispier texture or thicker for a chewier bite. Watch baking times accordingly.
5. How long do baked cheese crackers last?
Store in an airtight container at room temperature for up to a week. They’ll stay crispy but freshen up if you reheat briefly in the oven.
6. Can I freeze leftovers?
Yes, freeze baked crackers in a sealed bag for up to a month. Reheat in a 180°C (350°F) oven for 5 minutes until crispy and fragrant.
7. Can I use different cheeses?
Cheddar gives a sharp, tangy flavor, but Monterey Jack or Gouda will add creaminess. Adjust cheese type based on your preference.
8. My dough is too sticky or dry, what now?
If your dough feels sticky, dust it lightly with flour. If too dry, add a small splash of cold water and knead gently.
9. How can I customize the flavor?
Add herbs, spices, or even a pinch of cayenne for a spicy kick. Just stir them into the dry ingredients before adding water.
10. Can I prepare the dough ahead of time?
Yes, refrigerate the dough wrapped in plastic for up to 24 hours. It makes rolling easier and enhances flavor.
Baked cheese crackers might seem like just a nostalgic snack, but making them at home brings a new level of comfort and control. The warm, cheesy aroma filling the kitchen is a reminder that simple ingredients can create something truly satisfying. It’s a small, honest pleasure that feels especially meaningful right now.
Sharing these crispy, cheesy bites with others turns an ordinary moment into a little celebration. Whether you keep a batch handy for snacking or serve them alongside a casual meal, they’re a reminder that good food is often about the simplest, most honest ingredients coming together in a cozy way. Sometimes, that’s all you need to make the day a little brighter.

Hi, I’m Michael Anderson, the voice behind Overreacting To Salt. Yes, the name usually gets a laugh. And no, I am not actually afraid of salt. In fact, understanding salt and flavor balance is what inspired this entire blog.
 The voice behind Overreacting To Salt. Yes, the name usually gets a laugh. And no, I am not actually afraid of salt. In fact, understanding salt and flavor balance is what inspired this entire blog.
Overreacting To Salt is my space to talk honestly about cooking mistakes, kitchen wins, and the small details that make a big difference in flavor. I created it for home cooks who want to understand food better without feeling intimidated.
The voice behind Overreacting To Salt. Yes, the name usually gets a laugh. And no, I am not actually afraid of salt. In fact, understanding salt and flavor balance is what inspired this entire blog.
Overreacting To Salt is my space to talk honestly about cooking mistakes, kitchen wins, and the small details that make a big difference in flavor. I created it for home cooks who want to understand food better without feeling intimidated.