These mini flatbread bites started as a way to use up leftover bread and whatever cheese and veggies I had in the fridge. They’re simple, yes, but there’s something about making tiny, shareable snacks that sparks a bit of joy in the chaos of a busy week. They’re perfect for when you want something casual, customizable, and just a little bit special.
What I love most is how adaptable these bites are. You can swap in different toppings depending on what’s in season or what you’re craving. Plus, they come together quickly—no need for fancy dough or complicated techniques. It’s honest, straightforward cooking, with just enough room for creativity to shine through.
Focusing on the charm of making a snack-sized, shareable appetizer that transforms everyday flatbread into a crowd-pleasing, customizable bite, perfect for casual gatherings or cozy nights in.
Tiny Flatbread, Big Flavors
- I love how these bites turn simple ingredients into something fun and shareable, especially when friends drop by unexpectedly.
- There’s a nostalgic rush in making something small and crispy, reminding me of childhood snacks but with a modern twist.
- Creating these mini flatbreads gives me a moment to be playful in the kitchen, experimenting with toppings I’d never usually put together.
- Feeding a crowd with just a few ingredients feels incredibly satisfying—watching everyone grab their favorite bites makes me proud.
- These bites are my go-to for a quick, cozy night in; they bring a little bit of joy without any fuss.
The story behind this recipe
This recipe was born out of a lazy Sunday afternoon experiment, trying to turn what I had in the fridge into something fun and snackable. I remember the first time I toasted a piece of flatbread with just a bit of olive oil and garlic, and the aroma that filled the kitchen—simple but so inviting. Since then, I’ve loved how these little bites can be adapted for any occasion, from casual get-togethers to quick snacks after work. It’s a reminder that sometimes, the simplest ingredients can lead to the most satisfying bites.
Historical & Cultural Roots
- Mini flatbread bites trace back to Mediterranean snack traditions, where small, shareable eats are common at gatherings.
- They gained popularity in modern tapas culture, emphasizing casual, customizable bites perfect for socializing.
- This recipe’s concept echoes ancient flatbread adaptations, but their bite-sized version is a recent, playful twist.
- The idea of transforming everyday bread into tiny, flavorful snacks emerged from the need for quick, adaptable party food.
Ingredient breakdown: key components
- Yeast dough: I prefer a quick, no-yeast flatbread for that tender, slightly chewy bite—skip the rise for speed.
- Olive oil: Brushed on before baking, it gives a beautiful golden color and a fragrant, smoky aroma, so don’t skimp.
- Cheese: I love a sharp, melty cheese like mozzarella or provolone—choose your favorite for a gooey, savory punch.
- Toppings: Fresh herbs, cherry tomatoes, or even a drizzle of honey—think vibrant, contrast-rich flavors that excite the palate.
- Salt & pepper: A pinch of flaky sea salt and freshly cracked black pepper add that final punch, so sprinkle generously but thoughtfully.
- Optional add-ins: Smoked paprika, crushed red pepper, or a little garlic powder—layer in smoky, spicy notes to elevate the bites.
- Fresh herbs: Basil, parsley, or oregano—add right before serving for a burst of herbal brightness and aromatic freshness.
Spotlight on key ingredients
Dough:
- Yeast dough: I prefer a quick, no-yeast flatbread for that tender, slightly chewy bite—skip the rise for speed.
- Olive oil: Brushed on before baking, it gives a beautiful golden color and a fragrant, smoky aroma, so don’t skimp.
- Cheese: I love a sharp, melty cheese like mozzarella or provolone—choose your favorite for a gooey, savory punch.
Toppings:
- Fresh herbs: Basil, parsley, or oregano—add right before serving for a burst of herbal brightness and aromatic freshness.
- Cherry tomatoes: Juicy and vibrant, they burst with a slightly sweet acidity when baked, adding color and flavor.
- Olive oil: The key to that glossy, crispy surface—brush generously for a rich, fragrant finish.
Notes for ingredient swaps
- Dairy-Free: Use plant-based cheeses like almond or soy cheese. They melt differently and may have a milder flavor, but work well for dairy allergies or vegan diets.
- Gluten-Free: Swap in a gluten-free flatbread or naan. Texture might be slightly different—more tender or crumbly—but still delicious.
- Oil Alternatives: Replace olive oil with avocado oil or melted coconut oil. Both add their own subtle flavor and smoke point differences.
- Cheese Choices: Switch mozzarella for feta or goat cheese. Feta adds a tangy punch, while goat cheese offers a creamy, slightly tart flavor.
- Herb Variations: Instead of basil, try thyme or cilantro. They bring fresh, vibrant notes that change the flavor profile.
- Topping Options: Add caramelized onions or roasted peppers instead of fresh veggies for a sweeter, smoky depth.
- Seasoning: Use smoked paprika or chili flakes in place of black pepper for a spicy, smoky twist.
Equipment & Tools
- Baking sheet: Provides a flat surface for baking and crisping.
- Rolling pin: Helps flatten the dough evenly.
- Pastry brush: For applying olive oil smoothly.
- Knife or cookie cutter: To cut uniform mini rounds.
- Oven: To bake the flatbreads to crispy perfection.
Guide to making mini flatbread bites
- Equipment & Tools: Gather a baking sheet (for oven), a rolling pin (to flatten dough), a pastry brush (for oil), and a knife (to cut).
- Preheat oven to 200°C (390°F). Line baking sheet with parchment paper for easy cleanup.
- Roll out dough: On a lightly floured surface, roll the flatbread dough to about 0.5 cm (¼ inch) thick. Use a 5–6 inch round cutter or a glass to cut out mini rounds.
- Arrange on sheet: Place the mini rounds evenly spaced on the prepared baking sheet. Brush lightly with olive oil using the pastry brush.
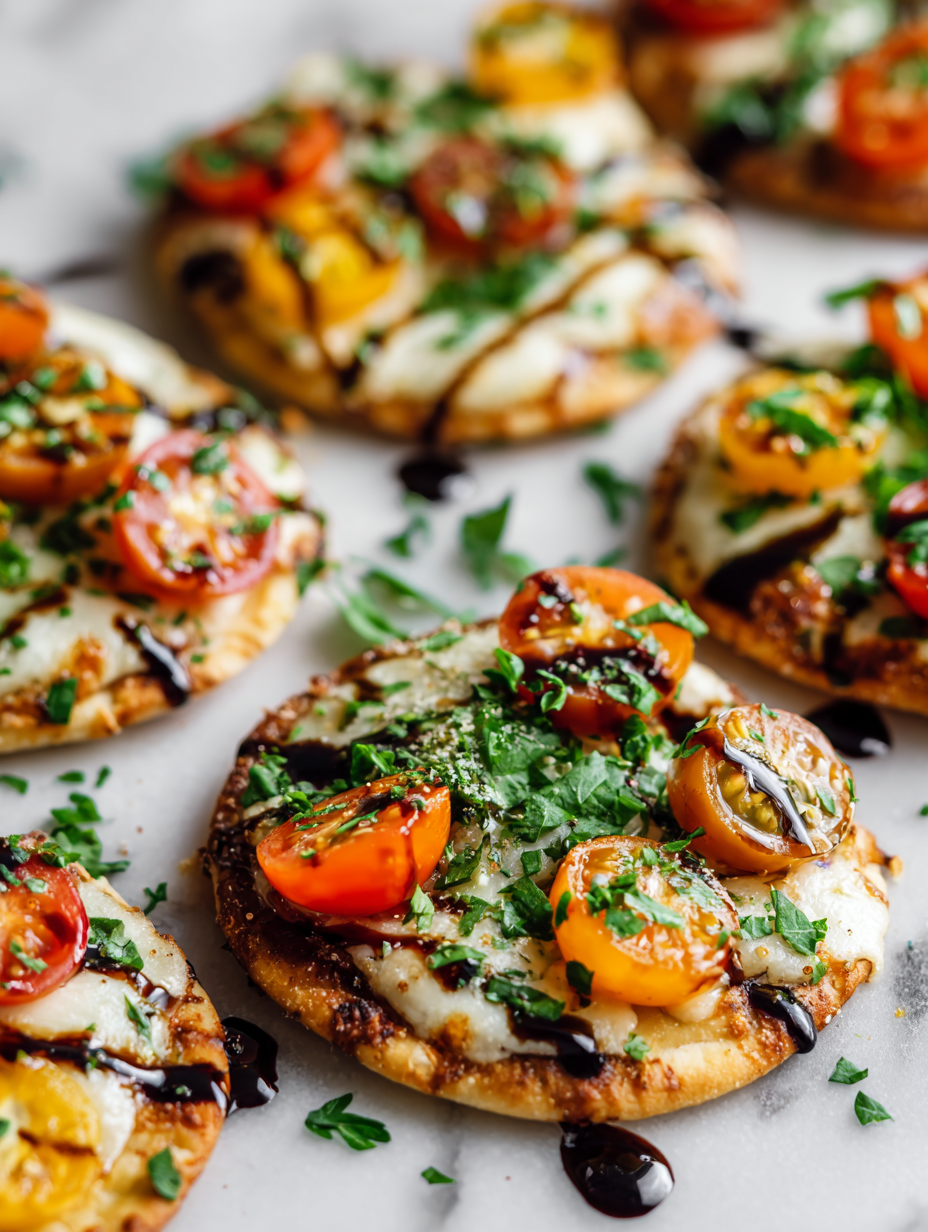
- Add toppings: Sprinkle cheese over each flatbread, then add herbs, cherry tomato halves, or other toppings of choice. Season with salt and pepper.
- Bake: Slide into the oven. Bake for 10–12 minutes until edges are golden and cheese is bubbling. Watch for a slight charring on edges for that crispy finish.
- Check doneness: The flatbreads should be crispy around the edges, cheese melted, and toppings cooked through. They should smell fragrant and look invitingly golden.
- Rest & serve: Let sit for 2 minutes. Transfer to a wire rack or serve directly from the sheet. Garnish with fresh herbs if desired.
Let the flatbreads rest for 2 minutes after baking to firm up. Serve warm, garnished with fresh herbs for maximum aroma and flavor.
How to Know It’s Done
- Edges are golden and crispy, with bubbling cheese—indicates proper bake.
- Toppings are cooked through, not raw—especially tomatoes or herbs.
- Flatbreads are firm but not burnt—avoid overbaking or undercooking.
Mini Flatbread Bites
Ingredients
Equipment
Method
- Preheat your oven to 200°C (390°F) and line a baking sheet with parchment paper.
- Place the flatbread on a lightly floured surface and roll it out to about 0.5 cm (¼ inch) thick with a rolling pin.
- Use a cookie cutter or a sharp knife to cut the flattened bread into small rounds, about 5–6 inches in diameter.
- Arrange the mini rounds evenly spaced on the prepared baking sheet. Brush the tops lightly with olive oil using a pastry brush.
- Sprinkle shredded cheese evenly over each flatbread round, then scatter halved cherry tomatoes and chopped herbs on top. Season with salt and pepper.
- Place the baking sheet in the oven and bake for 10–12 minutes until the edges are golden brown and cheese is bubbling.
- Remove from the oven and let the bites rest for 2 minutes to set the toppings and finish crisping.
- Garnish with additional fresh herbs if desired, then serve warm for a crunchy, cheesy snack.
Pro tips for perfect flatbread bites
- Use a hot oven—around 200°C (390°F)—for quick, even crisping.
- Brush with olive oil before baking—this helps achieve a golden, fragrant crust.
- Keep toppings light—overloading causes sogginess and uneven cooking.
- Slightly underbake if you want softer bites—edges should be crisp but not burnt.
- Use a pizza cutter or sharp knife—cut while warm for clean, neat edges.
- Rest for 2 minutes after baking—this helps toppings set and prevents spills.
- Broil for 1-2 minutes if cheese needs extra bubbly, but watch closely to avoid charring.
Common mistakes and how to fix them
- FORGOT to preheat the oven → Always preheat to avoid soggy bottoms.
- DUMPED toppings before baking → Place toppings carefully to prevent sliding off.
- OVER-TORCHED flatbreads → Remove once edges are golden and cheese bubbles, not burnt.
- MISSED resting time → Let bites rest 2 minutes for better texture and flavor setting.
Quick fixes and pantry swaps
- When oven smoke appears, splash vinegar into the oven cavity to neutralize odors.
- If flatbread sticks, patch with a little water and re-bake for a crispy edge.
- Splash a few drops of water on dry toppings to revive freshness before baking again.
- Dumped toppings? Gently reposition them with the back of a spoon before returning to oven.
- When flatbread burns quickly, shield edges with foil for even cooking and less charring.
Prep, store, and reheat tips
- You can prep the flatbread dough a day ahead; keep it wrapped in the fridge for up to 24 hours. It firms up in the cold, making rolling easier and more manageable.
- Assembled flatbreads (with cheese and toppings) can be stored in an airtight container in the fridge for up to 24 hours. The toppings might soften slightly, but they still taste fresh and flavorful.
- Reheat the flatbread bites in a 180°C (350°F) oven for 5–7 minutes until they’re crisp and warm again. The aroma of toasted bread and melted cheese will fill your kitchen.
- Shelf life is best within 24 hours for optimal crispness and flavor. After that, they may become soggy or dry out, so enjoy them sooner rather than later.
- For leftovers, reheat in a toaster oven or skillet for a quick revive. The bites will shimmer with heat and regain some of their initial crunch, though they won’t be as fresh as right out of the oven.
Top questions about mini flatbread bites
1. How do I prevent soggy flatbread bites?
Use a thin, even layer of toppings to prevent sogginess and ensure crisp bites.
2. What oven temperature and time are best?
Bake at 200°C (390°F) for 10-12 minutes until edges are golden and cheese bubbles.
3. How should I cut the flatbreads?
Use a sharp knife or pizza cutter while bites are warm for clean cuts.
4. Can I reheat leftovers?
Reheat in a 180°C (350°F) oven for 5-7 minutes until crispy and warm.
5. Are these gluten-free friendly?
Yes, swap in gluten-free flatbread or naan; texture might change slightly but still tasty.
6. Can I make this dairy-free?
Use dairy-free cheese like almond or soy cheese for a vegan or dairy-free version.
7. How much topping should I add?
Keep toppings light to avoid overloading and uneven baking.
8. When should I add fresh herbs?
Add herbs just before serving for maximum freshness and aroma.
9. Why is oven preheating important?
Using a preheated oven ensures even crisping and prevents sogginess.
10. What if they burn too fast?
If the flatbreads burn quickly, shield edges with foil and reduce oven temperature slightly.
These mini flatbread bites are a reminder that simple ingredients, when treated with a little care, can turn into something truly satisfying. They’re great for spontaneous gatherings or a quick snack that feels special enough to share. Plus, they’re a blank canvas—you can really make them your own.
In a busy week, I find it grounding to keep this recipe in my back pocket. It’s fast, forgiving, and always a hit. Sometimes, the best moments in the kitchen come from just tossing together what’s on hand and letting the oven do its magic.

Hi, I’m Michael Anderson, the voice behind Overreacting To Salt. Yes, the name usually gets a laugh. And no, I am not actually afraid of salt. In fact, understanding salt and flavor balance is what inspired this entire blog.
 The voice behind Overreacting To Salt. Yes, the name usually gets a laugh. And no, I am not actually afraid of salt. In fact, understanding salt and flavor balance is what inspired this entire blog.
Overreacting To Salt is my space to talk honestly about cooking mistakes, kitchen wins, and the small details that make a big difference in flavor. I created it for home cooks who want to understand food better without feeling intimidated.
The voice behind Overreacting To Salt. Yes, the name usually gets a laugh. And no, I am not actually afraid of salt. In fact, understanding salt and flavor balance is what inspired this entire blog.
Overreacting To Salt is my space to talk honestly about cooking mistakes, kitchen wins, and the small details that make a big difference in flavor. I created it for home cooks who want to understand food better without feeling intimidated.